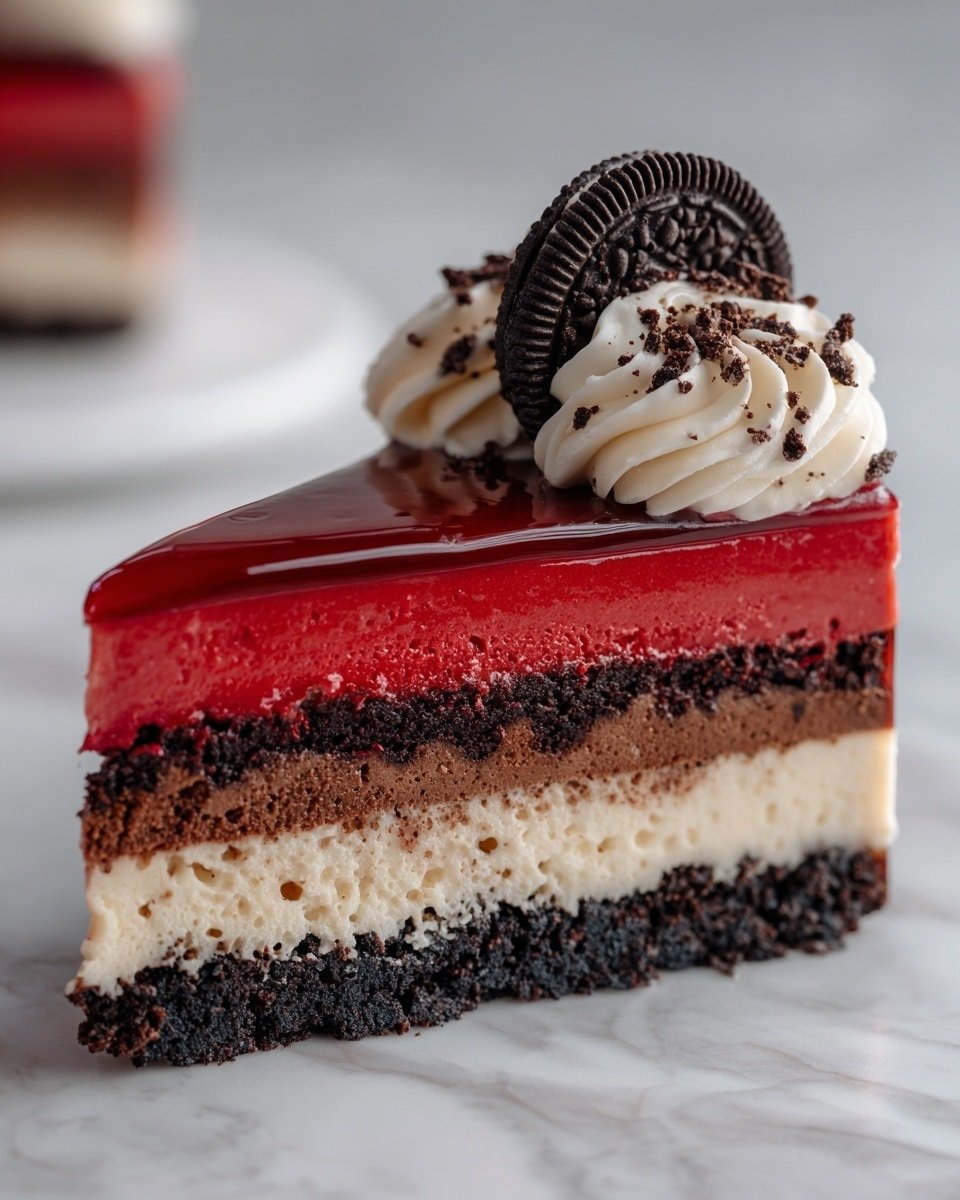
There’s something truly enchanting about the Red Velvet Oreo Cheesecake Recipe — a rich, velvety red velvet cheesecake layered with luscious vanilla cream and finished with a crunch of Oreo crust and silky chocolate ganache. It’s the kind of dessert that feels like a warm hug, perfect for celebrations, cozy weekends, or any time you want to impress friends with a showstopper that tastes as dreamy as it looks.

Jump to:
- Meet the Magic Behind This Dish
- Why You’ll Love This
- The Essentials: Ingredients That Do the Work
- Step-by-Step: Bringing Red Velvet Oreo Cheesecake Recipe to Life
- Pro Moves to Elevate It
- Switch It Up: Creative Variations
- Storage & Reheating Tips
- Serving Inspiration
- Frequently Asked Questions
- Notes & Handy Tools
- Full Recipe
Meet the Magic Behind This Dish
This Red Velvet Oreo Cheesecake Recipe was born from my love of combining classic flavors in unexpected ways. Inspired by childhood memories of red velvet cake and Oreo cookies, I wanted to create a cheesecake that sings with layers of contrast — the creamy, tangy cheesecake, the toasty Oreo crust, and the deep red velvet hue that makes your eyes sparkle. You’ll notice that signature cocoa whisper in every bite, wrapped in a velvety texture that lingers just long enough to keep you reaching for more.
Why You’ll Love This
This recipe masterfully balances decadence with approachability, delivering a dessert that’s as visually stunning as it is delicious. The layers hold their own but come together in harmonious bliss.
- Texture That Melts: Smooth, creamy cheesecake meets a crunchy, buttery Oreo crust that practically melts on your tongue.
- Flavor Layers You’ll Crave: The subtle cocoa from the red velvet blends with vanilla notes and a rich chocolate ganache finish—each bite layered in joy.
- Quick to Master: The steps are straightforward; even if you’re new to cheesecakes, you’ll be surprised how easy it is to get restaurant-quality results.
- Perfect Anytime Meal: Whether it’s a festive holiday or a casual coffee date, this cheesecake feels like a celebration in every forkful.
The Essentials: Ingredients That Do the Work
Getting the ingredients right is half the joy in this Red Velvet Oreo Cheesecake Recipe. Choosing fresh cream cheese and quality Oreos makes all the difference when it comes to that silky texture and crunchy base. I also love that the cocoa powder and red food coloring give it the perfect signature red hue without overpowering the flavor.
- Oreo Cookies: Look for classic Oreos, crushed finely. They give the crust its toasty flavor and unbeatable texture.
- Cream Cheese: Full-fat, softened cream cheese is your best friend for a smooth, luscious cheesecake layer.
- Cocoa Powder: Use unsweetened for authentic red velvet taste and that subtle chocolate warmth.
- Red Food Coloring: Gel colors work great to get a vibrant red without watery batter.
- Heavy Cream: Essential for creating a rich, glossy chocolate ganache topping.
Quick Note: Precise amounts and timing live in the recipe card at the end.
Step-by-Step: Bringing Red Velvet Oreo Cheesecake Recipe to Life
Step 1 — Gather, Chop, and Prep
Start by lining your 9-inch springform pan with parchment paper on the bottom and greasing the sides. You’ll want your Oreo cookies crushed finely—either blitz them in a food processor or place them in a zip bag and give them a good whack with a rolling pin. The texture should feel like wet sand once you mix in the melted butter. At this point, preheat your oven to 325°F (163°C). I find setting up this prep station smooths out the process and gets you into a happy baking rhythm.
Step 2 — Heat, Stir, and Build Flavor
Once your Oreo crust is pressed evenly into the pan and baked till it’s just toasty (about 8-10 minutes), it’s time to whip up the red velvet cheesecake layer. Cream your softened cream cheese with sugar until luxuriously smooth, then add the sour cream, eggs, cocoa powder, vanilla, and red food coloring—pour over that golden crust and smooth the top like spreading silk. Repeat the creamy beat for the vanilla cheesecake layer and gently pour it over the red velvet to create that gorgeous dual-color effect. Tuck it into the oven and watch those edges firm up while the center jiggles with anticipation — this baking dance takes about 50-60 minutes.
Step 3 — Finish and Taste-Test
After baking, don’t rush! Leaving the cheesecake in the warm oven with the door cracked open is a gentle transition that keeps cracks at bay and texture creamy. When thoroughly chilled, whisk together the ganache by heating cream until just steaming, then pouring it over chocolate chips. Stir patiently until it’s glossy and velvety — pouring this over the cheesecake is like icing on an already-perfect cake. I always sneak a little taste here; if it’s smooth and balanced, I know you’re in for a real treat.
Pro Moves to Elevate It
I’ve learned a few tricks through trial, error, and (often) happy taste-testing that make this Red Velvet Oreo Cheesecake Recipe truly shine. Paying attention to temperature, timing, and gentle mixing makes all the difference.
- Heat Wisdom: Bring cream cheese to room temperature to avoid lumps; cold ingredients will fight you here.
- Timing Trick: Don’t rush cooling—proper chilling prevents cracks and boosts creaminess.
- Make-Ahead Strategy: This cheesecake actually tastes better after resting overnight; prep a day ahead for smooth slicing.
- Common Slip-Up: Avoid overmixing eggs into the batter to keep the texture dense and silky, not rubbery.
Switch It Up: Creative Variations
If you love this Red Velvet Oreo Cheesecake Recipe, why not play around with flavors and textures? Adding fruit compotes, swapping chocolate chips for white chocolate in the ganache, or sprinkling toasted nuts on top can add delightful surprises.
When You’re Feeling Bold
Try stirring in a splash of espresso into the ganache for a mocha twist, or fold mini Oreo pieces into the vanilla cheesecake layer for extra crunch. For a festive touch, a sprinkle of cinnamon or cayenne pepper can awaken the depth of the red velvet without overpowering it.
Storage & Reheating Tips
This cheesecake keeps beautifully in the fridge for up to 5 days—just keep it in an airtight container or covered tightly with plastic wrap to preserve moisture. For longer storage, wrap well and freeze for up to 2 months. When you’re ready, thaw overnight in the fridge and serve chilled. Avoid microwaving—it changes the texture, and you want that velvety firmness intact.
Serving Inspiration
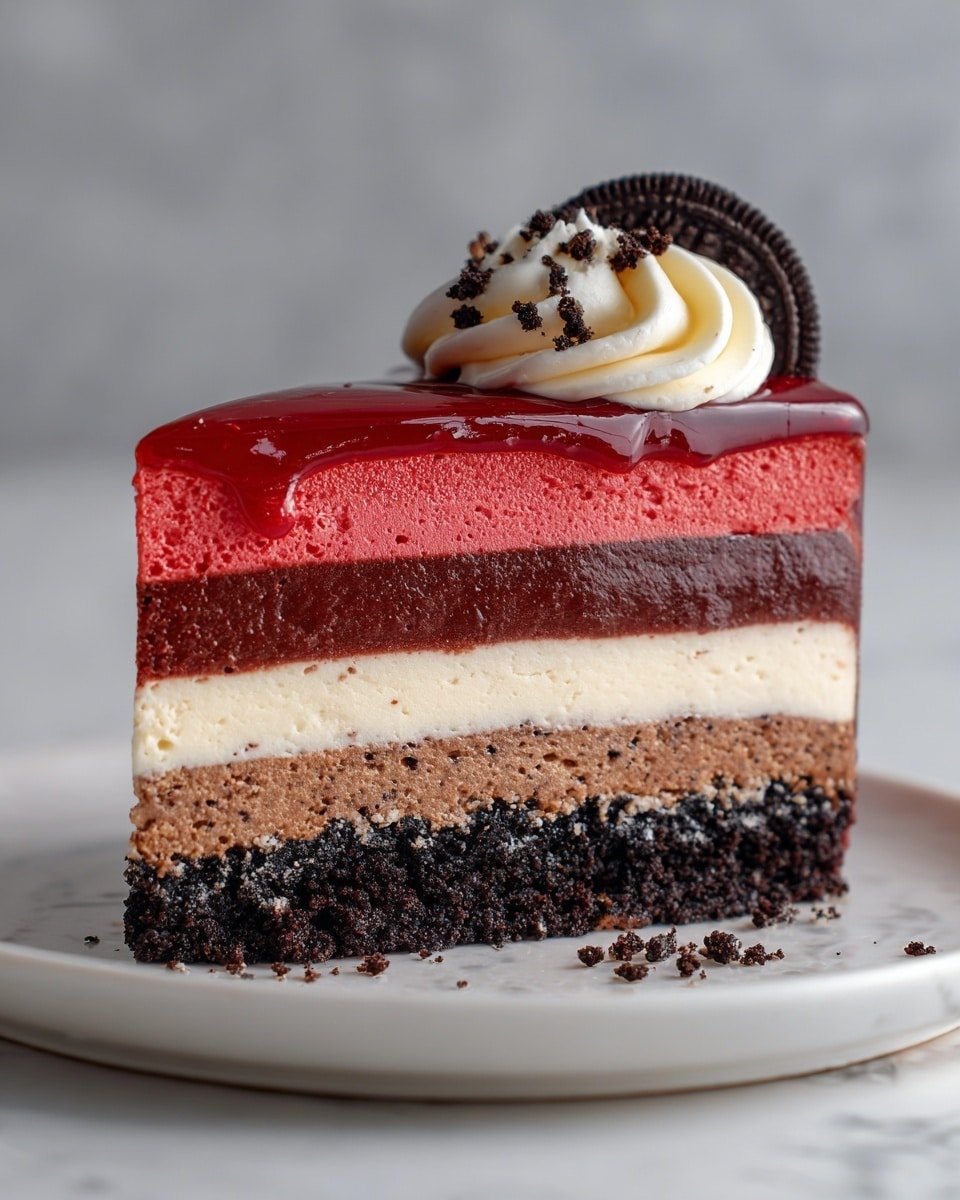
I love serving this Red Velvet Oreo Cheesecake Recipe with a simple dollop of fresh whipped cream and a few whole Oreos perched on top for that extra wow factor. Pair it with a rich espresso or a glass of chilled Rosé for fancy occasions, or keep it casual with milk for late-night indulgence. Either way, the slices hold their shape beautifully—perfect for shareable moments or solitary treats.
Frequently Asked Questions
Absolutely! While Oreos give a classic flavor and a hint of creaminess, any chocolate cookie will work well. Just crush them finely and adjust the sugar in the crust if your cookies are very sweet or not.
The key is gentle mixing and slow cooling. Avoid over-beating the batter to prevent air bubbles, and after baking, leave the cheesecake in the oven with the door open for an hour to cool gradually. Lastly, chilling thoroughly overnight helps it set perfectly.
This recipe relies on cream cheese and heavy cream for its signature texture; however, you can experiment with dairy-free cream cheese and coconut cream substitutes. Keep in mind, the texture might be softer and baking times may vary, so it’s a fun challenge if you like recipe tweaks!
Use a sharp knife dipped in hot water and wiped dry before each cut. The warmth helps create smooth slices and prevents sticking. Chilling the cheesecake thoroughly also ensures clean edges.
Notes & Handy Tools
A 9-inch springform pan is essential for easy release. A stand mixer helps get the cream cheese silky smooth, but a hand mixer works just as well if you prefer. For crushing Oreos, a food processor saves time, but a rolling pin and robust bag work in a pinch. A heatproof bowl for the ganache makes whisking the chocolate and cream a breeze.
PrintFull Recipe
Red Velvet Oreo Cheesecake Recipe

A decadent and visually stunning Red Velvet Oreo Cheesecake featuring a crunchy Oreo crust, creamy layers of red velvet and vanilla cheesecake, topped with rich chocolate ganache and Oreo garnish. Perfect for celebrations and dessert lovers.
- Prep Time: 30 minutes
- Cook Time: 1 hour 10 minutes
- Total Time: 7 hours 40 minutes
- Yield: 12 servings
- Category: Dessert
- Method: Baking
- Cuisine: American
Ingredients
Oreo Crust
- 2 ½ cups Oreo cookie crumbs (about 25-30 cookies, crushed)
- 5 tablespoon unsalted butter, melted
Red Velvet Cheesecake Layer
- 16 oz (2 blocks) cream cheese, softened
- ¾ cup granulated sugar
- ¼ cup sour cream
- 2 large eggs
- 1 ½ tablespoon cocoa powder
- 1 ½ teaspoon vanilla extract
- 1 tablespoon red food coloring
Vanilla Cheesecake Layer
- 16 oz (2 blocks) cream cheese, softened
- ¾ cup granulated sugar
- ¼ cup sour cream
- 2 large eggs
- 1 ½ teaspoon vanilla extract
Chocolate Ganache Topping
- ½ cup heavy cream
- ¾ cup semi-sweet chocolate chips
Garnish (Optional)
- Whipped cream
- Oreo cookie crumbs
- Whole Oreos
Instructions
- Make the Oreo Crust: Preheat the oven to 325°F (163°C). Grease a 9-inch springform pan and line the bottom with parchment paper. Mix Oreo cookie crumbs and melted butter until combined. Press the mixture into the bottom of the pan. Bake for 10 minutes, then set aside to cool.
- Make the Red Velvet Cheesecake Layer: In a large bowl, beat cream cheese and sugar until smooth. Add sour cream, eggs, cocoa powder, vanilla extract, and red food coloring, mixing until combined. Pour the red velvet batter over the cooled crust and spread evenly.
- Make the Vanilla Cheesecake Layer: In another bowl, beat cream cheese and sugar until smooth. Add sour cream, eggs, and vanilla extract, mixing until fully incorporated. Carefully pour over the red velvet layer, smoothing the top.
- Bake the Cheesecake: Bake at 325°F (163°C) for 60 minutes, until the edges are set but the center is slightly jiggly. Turn off the oven and leave the cheesecake inside with the door slightly open for 1 hour. Transfer to the refrigerator and chill for at least 6 hours or overnight.
- Make the Chocolate Ganache: Heat heavy cream in a saucepan until hot but not boiling. Pour over chocolate chips and let sit for 2 minutes, then stir until smooth. Let cool slightly, then pour over the cheesecake, spreading evenly.
- Garnish and Serve: Pipe whipped cream around the edges and sprinkle with Oreo crumbs. Decorate with whole Oreos on top. Slice and serve chilled. Enjoy!
Notes
- For best results, let the cheesecake chill overnight to set properly.
- If you don't have red food coloring, use gel food coloring for a more vibrant hue.
- Use full-fat cream cheese and sour cream for the creamiest texture.
- Make sure all wet ingredients are at room temperature before mixing to avoid lumps.
- To prevent cracking, avoid overbaking and allow the cheesecake to cool gradually in the oven.
- Garnish with whipped cream and whole Oreos just before serving to maintain freshness.


Leave a Reply