There’s something so cozy about curling up with a big bowl of sweet and toasty popcorn, especially when it’s infused with flavors that transport you straight to Hogsmeade. This Magical Harry Potter Butterbeer Popcorn for Movie Nights Recipe is the ultimate treat for any fan looking to bring a little wizardry into snack time. Rich caramel tones paired with that buttery, creamy pop will have you spellbound the moment it hits your taste buds—perfect for chilly nights, binge-watching marathons, or sharing with friends during a Harry Potter movie fest.
Jump to:
- Meet the Magic Behind This Dish
- Why You’ll Love This
- The Essentials: Ingredients That Do the Work
- Step-by-Step: Bringing Magical Harry Potter Butterbeer Popcorn for Movie Nights Recipe to Life
- Pro Moves to Elevate It
- Switch It Up: Creative Variations
- Storage & Reheating Tips
- Serving Inspiration
- Frequently Asked Questions
- Notes & Handy Tools
- Full Recipe
Meet the Magic Behind This Dish
I first dreamed up this Magical Harry Potter Butterbeer Popcorn for Movie Nights Recipe after spotting a Butterbeer-inspired popcorn at a theme park and thinking, "I can make that even better at home." What makes it unique is the way the buttery sweetness perfectly coats each popped kernel, creating a warm, golden shimmer that’s just as enchanting to look at as it is to eat. The scent alone—a cozy mix of caramel, vanilla, and a hint of butterscotch—will pull you right into the wizarding world with every whiff.
Why You’ll Love This
The magic is in the balance—the buttery richness, subtle spices, and just the right touch of sweetness come together to create an irresistible nurture-yourself kind of snack. It’s super easy to whip up but feels like a special occasion each time.
- Texture That Melts: Each kernel is enveloped in a creamy, slightly crunchy caramel coating that stays fresh and toasty.
- Flavor Layers You’ll Crave: Buttery butterscotch hints mingle with vanilla and a whisper of sea salt to awaken your taste buds.
- Quick to Master: From popping kernels to coating them in golden magic, it’s ready in just about 20 minutes.
- Perfect Anytime Meal: Whether it’s a movie night snack or a little happy treat after a tough day, this popcorn brings joy.
The Essentials: Ingredients That Do the Work

To nail this Magical Harry Potter Butterbeer Popcorn for Movie Nights Recipe, you’ll want to pick ingredients that deliver rich flavor and help balance the sweetness without overwhelming the popcorn. The key is quality butter, good popcorn kernels, and a few special flavor boosters that turn simple popcorn into an enchanting snack.
- Popcorn Kernels: Choose fresh, high-quality kernels for fluffy, fully popped pieces with a sturdy crunch.
- Butter: Use unsalted butter to control salt levels, letting the recipe’s flavors shine without bitterness.
- Brown Sugar & Light Corn Syrup: These work together to create that golden, glossy caramel coating with deep flavor and a smooth finish.
- Vanilla Extract: Adds warmth and complexity that lifts the buttery richness beautifully.
- Sea Salt: Just a pinch to balance the sweetness and highlight the savory notes.
Quick Note: Precise amounts and timing live in the recipe card at the end. Those little details make all the difference!
Step-by-Step: Bringing Magical Harry Potter Butterbeer Popcorn for Movie Nights Recipe to Life
Step 1 — Gather, Chop, and Prep
Start by measuring out your popcorn kernels and setting your work station. You’ll need a large pot with a lid (or an air popper if you have one), a heavy saucepan for the caramel, and a sturdy spatula for stirring. Get your butter ready and have your vanilla extract close by. When the popcorn pops, you want to be ready to work swiftly and evenly. You’ll notice the lively pop-pop-pop sounds that tell you the kernels are bursting open—once the popping slows to a few seconds between pops, it’s time to pull the pot off the heat.
Step 2 — Heat, Stir, and Build Flavor
This is where the magic really begins: melt your butter over medium heat, add brown sugar and light corn syrup, and stir until everything melds into a bubbling caramel that’s golden and aromatic. You’ll see it thicken and bubble, and the warm scent of caramelizing sugar will fill your kitchen—listen for the gentle sizzle and watch the glossy sheen develop before adding the vanilla and a pinch of sea salt. The aroma here is like a cozy hug, and it’s that fragrant caramel sauce that will turn your popcorn into a Butterbeer dream.
Step 3 — Finish and Taste-Test
Pour your golden caramel over the warm popcorn and fold gently but thoroughly so every kernel gets a lovely, even coat. Spread it out on a parchment-lined baking sheet to cool and let the coating set to that perfect balance of crisp and creamy. As it cools, the caramel hardens just enough to give you that satisfying crunch, but the butter sweetness stays soft on your tongue. Don’t forget to taste a kernel while it’s still warm—you’ll notice how the flavors balance in a way that feels exactly like Butterbeer, but with popcorn’s toasty charm.
Pro Moves to Elevate It
I’ve learned a few things that take this already delightful recipe into the realm of magic. For instance, using light corn syrup instead of honey gives a cleaner caramel texture and helps keep the popcorn from getting sticky. Timing when you add the vanilla extract is crucial—it goes in right at the end of cooking the caramel to preserve that bright flavor.
- Heat Wisdom: Keep your heat moderate to prevent burning the caramel; patience pays off with smooth, luscious coating.
- Timing Trick: Coat your popcorn immediately while the caramel’s still warm so it sticks evenly but doesn’t clump too much.
- Make-Ahead Strategy: This popcorn holds well in an airtight container for days—perfect for prepping before a movie marathon.
- Common Slip-Up: Don’t skip stirring during caramel cooking; it ensures no burnt bits ruin the flavor or color.
Switch It Up: Creative Variations
Once you’ve got the classic down, why not experiment? Adding a dash of cinnamon or nutmeg brings an extra cozy warmth reminiscent of butterbeer’s spice notes. For a playful twist, toss in some finely crushed toffee bits or drizzle melted white chocolate over the cooled popcorn for an extra indulgent treat. Each variation keeps the heart of the Magical Harry Potter Butterbeer Popcorn for Movie Nights Recipe while giving you new ways to enjoy the magic.
When You’re Feeling Bold
If you want to dial up the adventure, sprinkle a pinch of chili powder or cayenne after coating for a fiery surprise that plays beautifully against the buttery sweetness. Or swap out traditional kernels for a mix that includes gourmet mushroom popcorn for extra crunch and flavor complexity. It’s your snack—own the magic your way and have fun with it!
Storage & Reheating Tips
Store your Butterbeer popcorn in an airtight container at room temperature to keep that perfect crunch for up to a week. Since reheating can make the caramel sticky or soggy, I recommend enjoying it fresh or giving slightly stale popcorn a quick 5-minute toast in a low oven (about 250°F) on a baking sheet lined with parchment to refresh the crunch. Avoid the microwave, which can soften the caramel coating and ruin the texture.
Serving Inspiration

This popcorn dazzles on its own, but if you’re hosting a magical movie night, try pairing it with a chilled Butterbeer-flavored soda or a creamy vanilla milkshake to echo those classic flavors. For an extra cozy vibe, serve it alongside warm apple cider or a hot buttered rum (for adult nights). If you want to get fancy, sprinkle popcorn in a large glass bowl layered with chunks of warm soft pretzel bites for an irresistible sweet-savory combo your friends will rave about.
Frequently Asked Questions
You can, but popcorn popped fresh on the stovetop or air popper absorbs the caramel coating much better, so for the best texture and flavor, I recommend popping your own kernels.
Sticky popcorn usually means the caramel was too hot or not stirred well during cooking. Try spreading the coated popcorn on parchment to cool quickly and, if needed, bake at low heat for 5-10 minutes to restore crispness.
Absolutely! Swap regular butter for vegan butter or coconut oil and make sure your vanilla extract doesn’t contain alcohol. The rest of the ingredients are naturally vegan-friendly.
When stored properly in an airtight container, the popcorn keeps its crunch and flavor for about 5 to 7 days at room temperature.
Notes & Handy Tools
For the best results, use a heavy-bottomed saucepan to cook your caramel evenly without scorching. A wooden spoon or heat-resistant silicone spatula helps stir gently without scratching your pots. A large rimmed baking sheet lined with parchment paper is perfect for cooling the popcorn and preventing sticking. Lastly, a digital candy thermometer isn’t required but can be a super helpful tool to get your caramel to the perfect temperature every time.
PrintFull Recipe
Magical Harry Potter Butterbeer Popcorn for Movie Nights Recipe
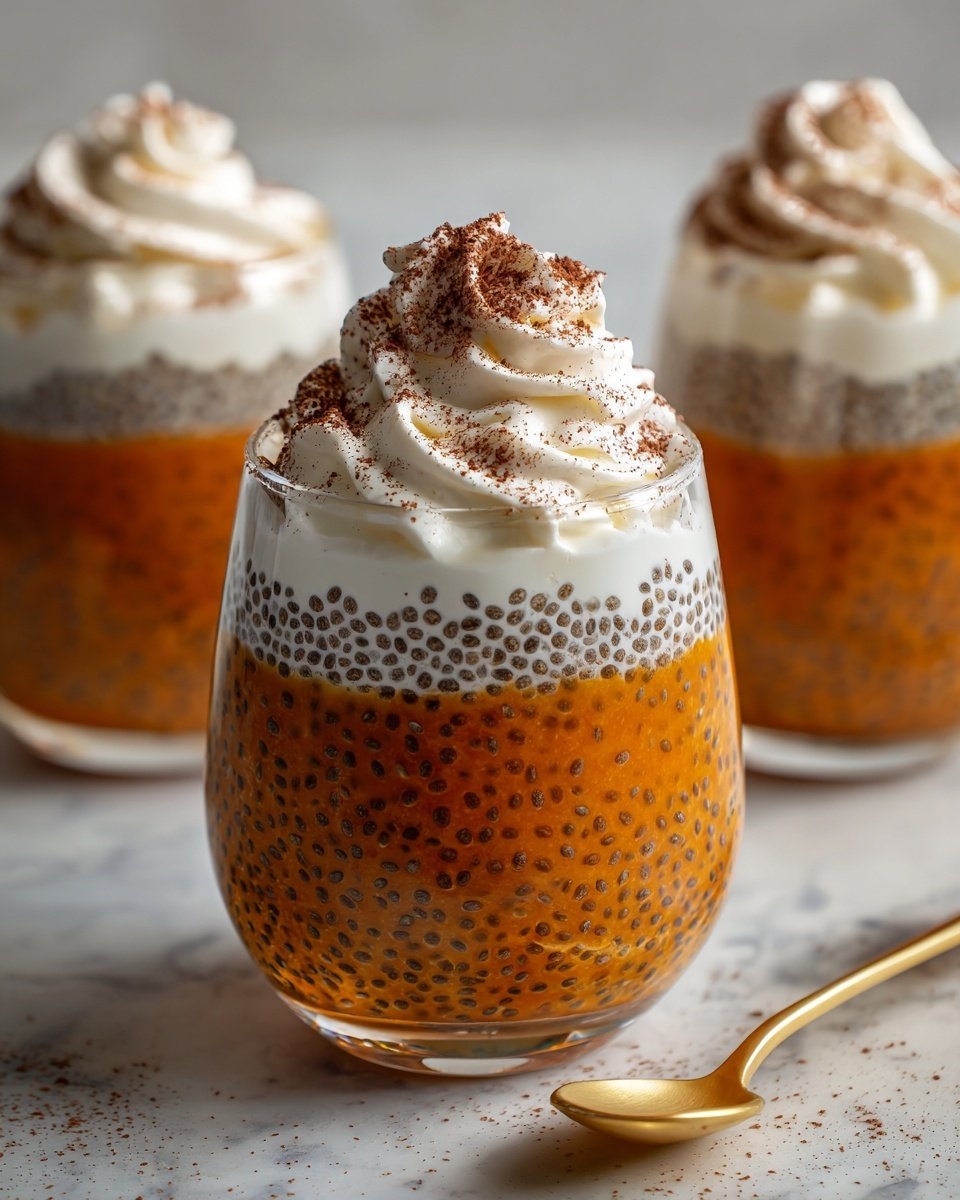
This Easy Pumpkin Chia Seed Pudding is a nutritious and delicious fall-inspired dessert that combines creamy pumpkin puree with fiber-rich chia seeds. With just 10 minutes of active preparation and a few hours of chilling, this pudding achieves a luscious, creamy texture perfect for a healthy breakfast or snack. The warming pumpkin pie spice and natural sweetness from maple syrup make it a cozy, wholesome treat.
- Prep Time: 10 minutes
- Cook Time: 0 minutes
- Total Time: 4 hours 10 minutes
- Yield: 4 servings
- Category: Dessert
- Method: No-Cook
- Cuisine: American
- Diet: Vegetarian
Ingredients
Base Ingredients
- 1 cup milk of choice (oat milk, coconut milk, almond milk)
- ½ cup pumpkin puree
- 1-2 tablespoons maple syrup
- 1 teaspoon pumpkin pie spice
- ⅛ teaspoon salt
Thickener
- ¼ cup chia seeds
Instructions
- Create Your Flavor Base: In a medium bowl, whisk together the milk, pumpkin puree, pumpkin pie spice, salt, and maple syrup until completely smooth and lump-free. Use a fork or small whisk to break up any pumpkin clumps for the silkiest consistency.
- Incorporate the Chia Magic: Add the chia seeds to your pumpkin mixture and stir vigorously for about 30 seconds to prevent clumping and ensure even absorption of liquid.
- The Anti-Clump Insurance: Wait exactly 5 minutes, then stir the mixture again to break up any clumps and distribute the chia seeds evenly as they begin to gel.
- The Transformation Phase: Cover the bowl and refrigerate for at least 4 hours or overnight to allow the chia seeds to absorb the liquid and form a creamy pudding-like consistency.
- Final Touches: Before serving, give your pudding one last stir and taste-test. Adjust sweetness if needed with extra maple syrup. The texture should be thick, creamy, and spoonable like a perfect pudding.
Notes
- Use coconut milk for a richer, creamier texture.
- Substitute maple syrup with honey, agave, stevia, or 2-3 blended pitted dates for natural sweetness.
- Use a pumpkin pie spice blend or individual spices (cinnamon, nutmeg, ginger, cloves) according to preference.
- Ensure thorough stirring after 5 minutes to prevent chia clumps and achieve smooth pudding.
- Chill for at least 4 hours, but overnight chilling improves texture and flavor.


Leave a Reply