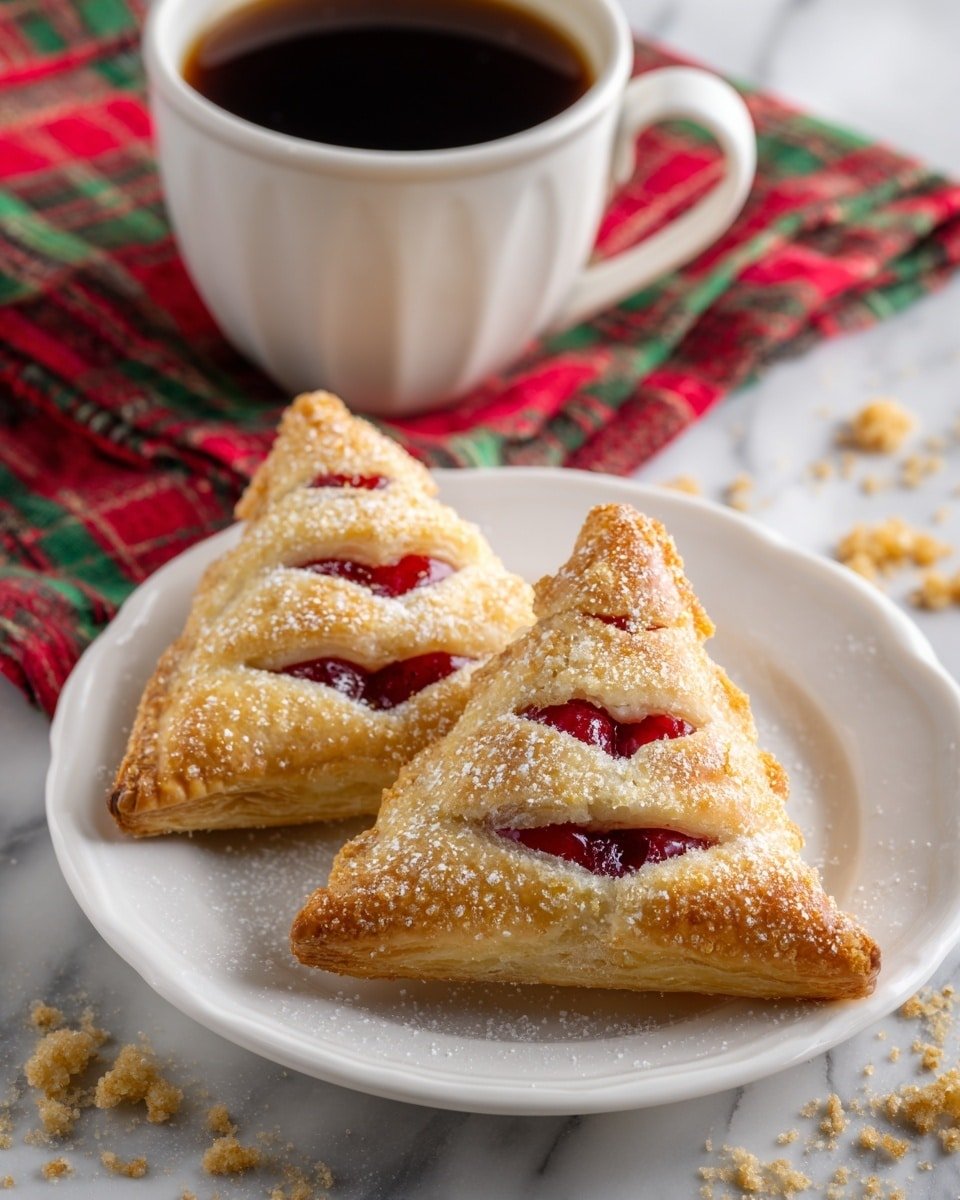
There’s something wonderfully nostalgic about a flaky, golden Cherry Hand Pie. Whether it’s a cozy afternoon treat with a cup of tea or a sweet highlight at your weekend brunch, this Cherry Hand Pies Recipe hits all the right notes. Each bite offers the perfect balance of buttery crust and sticky, luscious cherry filling that instantly transports you to simpler, joyful moments. I love pulling these out of the oven when the weather turns crisp – the warm, fruity aroma fills the kitchen, making it impossible to wait to dive in!

Jump to:
- Meet the Magic Behind This Dish
- Why You’ll Love This
- The Essentials: Ingredients That Do the Work
- Step-by-Step: Bringing Cherry Hand Pies Recipe to Life
- Pro Moves to Elevate It
- Switch It Up: Creative Variations
- Storage & Reheating Tips
- Serving Inspiration
- Frequently Asked Questions
- Notes & Handy Tools
- Full Recipe
Meet the Magic Behind This Dish
This Cherry Hand Pies Recipe came about from my love of handheld treats that feel special but aren’t fussy. What makes it unique is the use of store-bought pie crust for that golden, flaky texture paired with a luscious, thick cherry pie filling you can spoon right in. You’ll notice a subtle crunch on the outside from a sprinkle of sanding sugar, which adds a toasty twinkle that makes every bite feel like a celebration.
Why You’ll Love This
This Cherry Hand Pies Recipe is a joyful way to enjoy classic cherry pie flavor with less fuss but all the warmth and comfort. It’s approachable yet impressive, perfect for both beginners and those who’ve baked their share of pies before.
- Texture That Melts: Buttery, flaky crust that shatters gently with each bite.
- Flavor Layers You’ll Crave: Sweet-tart cherry filling balanced with a hint of vanilla and cinnamon.
- Quick to Master: Using refrigerated crust makes it easy but still yields bakery-worthy results.
- Perfect Anytime Meal: Great for breakfast, dessert, or a handheld snack on the go.
The Essentials: Ingredients That Do the Work

Choosing the right ingredients here really sets you up for success. Since the crust and filling do the heavy lifting, I recommend picking high-quality refrigerated pie crust and a cherry filling that’s thick and not overly sweet so that you get that natural fruit tang with every crumbly bite.
- Refrigerated Pie Crust: Look for one with no cracks and easy pliability — this makes folding and sealing your hand pies a breeze.
- Cherry Pie Filling: Choose a brand with whole cherries and a rich filling that’s not too runny, so it doesn’t leak during baking.
Quick Note: Precise amounts and timing live in the recipe card at the end.
Step-by-Step: Bringing Cherry Hand Pies Recipe to Life
Step 1 — Gather, Chop, and Prep
Start by preheating your oven and lining a baking sheet with parchment paper. Have your pie crusts thawed at room temperature so they’re easy to work with — cold dough can crack, warm dough gets sticky. I like to keep a little flour on hand to dust my work surface and rolling pin to avoid sticking. Grab a pastry brush ready for sealing edges with egg wash, and get your cherry pie filling jar opened. As you unfold each crust, you’ll see how smooth and supple it feels — that’s your sign it’s ready for scooping delicious, ruby red filling right onto each square.
Step 2 — Heat, Stir, and Build Flavor
This step is all about building that luscious filling texture. We’re not cooking the filling heavily since it’s pre-prepared, but warming it slightly in a saucepan with a teaspoon of vanilla or a sprinkle of cinnamon really brings those flavors forward. As it bubbles gently, the smell of warm cherries will fill your kitchen — trust me, this moment always gets me excited because it smells like pie day is officially here. Stir gently to keep the fruit whole and the filling thick but fluid enough to spoon.
Step 3 — Finish and Taste-Test
Once your hand pies are assembled and sealed with egg wash for that toasty finish, pop them into the oven. While they bake, the crust puffs and browns to a gorgeous golden. When they come out, let them cool enough to handle, then test a slow, careful bite. You’ll notice how the crust crackles under your teeth and the cherry filling shines bright with sweet and tart notes mingling perfectly. Feel free to add a light dusting of powdered sugar if you want a touch of extra charm before serving.
Pro Moves to Elevate It
After trying this Cherry Hand Pies Recipe several times, I’ve learned a few tricks that make all the difference to get that perfect bakery-quality pie every time.
- Heat Wisdom: Warm the pie filling gently on low so it thickens slightly but doesn’t break down the fruit.
- Timing Trick: Let the pies chill in the fridge for 15 minutes before baking to help seal the crust well and prevent shrinking.
- Make-Ahead Strategy: You can prepare the assembled pies and freeze them uncooked on a tray, then bake fresh when craving strikes.
- Common Slip-Up: Avoid overfilling your pies – a heaping tablespoon is plenty to prevent leaking.
Switch It Up: Creative Variations
One of the best parts of this Cherry Hand Pies Recipe is how easy it is to make your own. Feel free to get creative with mix-ins or crust finishes to match your mood or season.
When You’re Feeling Bold
Try adding a splash of almond extract to the cherry filling for an unexpected depth or sprinkle in some chopped dark chocolate before sealing the crust. You could also swap part of the cherry filling for a handful of fresh blueberries or raspberries to brighten the flavor profile and add a juicy surprise. A pinch of chili powder mixed in can give it a spicy kick that pairs amazingly with the sweet fruit.
Storage & Reheating Tips
These hand pies keep beautifully in an airtight container at room temperature for a couple of days. For longer storage, freeze them once fully cooled — wrap individually to protect their flaky crust. To reheat, warm in a 350°F oven for about 8–10 minutes to revive the crispness. Avoid microwaving if you want to keep that toasty exterior intact, though it’s tempting for a quick fix!
Serving Inspiration
Cherry Hand Pies are delightful on their own, but you can pair them beautifully for different occasions. For a laid-back snack, they’re fantastic with a glass of cold milk or a simple hot tea. If you’re serving them for dessert, try dolloping whipped cream or vanilla ice cream on the side — the creamy contrast to the tart, warm cherries is pure magic. Want to impress at brunch? Arrange a few hand pies with a colorful fruit salad and coffee for a cozy, indulgent spread.
Frequently Asked Questions
Absolutely! Homemade crust adds a lovely personal touch, just keep it cold and roll gently to keep those flaky layers.
Don’t overfill the pies and make sure to pinch and seal the edges firmly with a fork or your fingers, plus an egg wash helps create a sticky seal.
Yes! Use a gluten-free pie crust and ensure your cherry filling doesn’t contain any gluten additives.
Reheating in a 350°F oven for 8–10 minutes keeps the crust crispy and the filling warm without sogginess.
Notes & Handy Tools
A sturdy rolling pin helps get even dough without tearing, while a quality pastry brush ensures smooth egg wash application. Parchment paper or a silicone mat keeps your baking sheet clean and prevents sticking. And if you don’t have a pie crust cutter, a sharp knife or a round biscuit cutter works perfectly for shaping your hand pies.
PrintFull Recipe
Cherry Hand Pies Recipe

Delight in these flaky, golden Cherry Hand Pies filled with sweet cherry pie filling, perfect for a handheld dessert treat. Made using refrigerated pie crusts for convenience, these pies offer a crisp exterior coated with optional coarse sanding sugar for extra sparkle and sweetness.
- Prep Time: 15 minutes
- Cook Time: 25 minutes
- Total Time: 40 minutes
- Yield: 12 servings
- Category: Dessert
- Method: Baking
- Cuisine: American
- Diet: Vegetarian
Ingredients
Pie Crust
- 3 boxes refrigerated pie crust (2 crusts each box)
Filling
- 1 can cherry pie filling (21 ounces)
Egg Wash
- 2 large eggs
- 2 tablespoons water
Optional
- Coarse sanding sugar
Instructions
- Preheat Oven: Preheat your oven to 375 degrees Fahrenheit to ensure it's ready for baking the hand pies.
- Prepare Egg Wash: In a small bowl, whisk together the 2 large eggs and 2 tablespoons of water until fully combined; set aside for brushing.
- Roll Out Pie Crust: Unroll the pie crusts and place them on a clean surface. Use a round cutter or a glass to cut out circles or squares large enough to hold the filling.
- Fill the Pies: Spoon about 1 to 2 tablespoons of cherry pie filling onto the center of each cut crust piece, being careful not to overfill to avoid leakage during baking.
- Seal the Pies: Fold the dough over the filling to form a hand pie shape (such as a half-moon if circular). Press the edges firmly with a fork to seal completely.
- Apply Egg Wash and Sugar: Brush the tops of the sealed pies with the prepared egg wash to give them a golden shine. If desired, sprinkle coarse sanding sugar on top for extra texture and sweetness.
- Bake: Place the hand pies on a baking sheet lined with parchment paper. Bake in the preheated oven for 25 minutes or until golden brown and crisp.
- Cool and Serve: Remove the pies from the oven and allow them to cool on a wire rack for at least 10 minutes before serving to let the filling set slightly.
Notes
- For a vegetarian-friendly option, use pie crusts that do not contain lard or animal fats.
- If cherry pie filling is unavailable, consider using fresh cherries cooked down with sugar and cornstarch as a homemade filling.
- Use a fork or a pie crimper to ensure the edges are tightly sealed to prevent filling from leaking during baking.
- Allow pies to cool adequately to avoid burning when biting into the filling.
- Storage: Store any leftovers in an airtight container at room temperature for up to 2 days, or refrigerate to extend freshness.


Leave a Reply