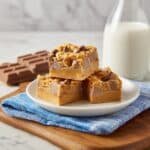
There’s something so irresistibly cozy about a sweet treat that mixes buttery cookie goodness with the crunchy, candy bar surprise packed inside. This Butterfinger Cookie Bars Recipe brings that perfect blend to your kitchen — golden cookie bars marbled with creamy peanut butter and studded with crispy Butterfinger chunks. It’s the kind of dessert you’ll want to make for a weekend treat, a casual get-together, or just because your sweet tooth calls for it. Cozy, fun, and simply delicious!

Jump to:
- Meet the Magic Behind This Dish
- Why You’ll Love This
- The Essentials: Ingredients That Do the Work
- Step-by-Step: Bringing Butterfinger Cookie Bars Recipe to Life
- Pro Moves to Elevate It
- Switch It Up: Creative Variations
- Storage & Reheating Tips
- Serving Inspiration
- Frequently Asked Questions
- Notes & Handy Tools
- Full Recipe
Meet the Magic Behind This Dish
I came up with this Butterfinger Cookie Bars Recipe while craving that nostalgic candy bar texture, but in a more shareable, soft-baked form. What’s wonderful here is the marriage of creamy peanut butter richness with the snappy, buttery crunch of chopped Butterfinger bits. When you bite in, there’s this lovely contrast between the golden cookie’s warmth and the toasty, crackly candy. It’s a sweet symphony of textures and flavors that makes every bite a little celebration.
Why You’ll Love This
This recipe nails that perfect balance of creamy, crunchy, and buttery that you can’t help but smile over. It’s straightforward enough for beginners but impressive enough to wow your friends and family at any casual gathering.
- Texture That Melts: Soft-baked cookie bars with little crispy Butterfinger shards add delightful crunch in every bite.
- Flavor Layers You’ll Crave: Hint of vanilla, rich peanut butter frosting, and buttery cookie base create luscious flavor depth.
- Quick to Master: Easy mixing steps with no complicated techniques make this a fun project you’ll repeat often.
- Perfect Anytime Meal: Great for dessert, snacking, or as a sweet pick-me-up with your afternoon coffee.
The Essentials: Ingredients That Do the Work

Choosing the right ingredients here makes all the difference. You want tender cookie bars with just the right balance of sweet, salty, and nutty notes — so quality basics paired with crunchy Butterfinger bars always do the trick.
- Unsalted Butter: Room temperature butter blends smoothly with sugars and creates that rich, tender base you’ll love.
- Butterscotch or Butterfinger Candy Bars: Look for big, crispy bars to chop so the flavor shines through without melting away too fast.
Quick Note: Precise amounts and timing live in the recipe card at the end.
Step-by-Step: Bringing Butterfinger Cookie Bars Recipe to Life
Step 1 — Gather, Chop, and Prep
First things first: get your tools ready—a large mixing bowl, hand mixer, a sturdy spatula, and a 9×13 inch baking dish lined with parchment paper. Chop your Butterfinger bars into rough chunks; I like to leave some bigger pieces alongside smaller crumbs to keep the texture interesting. When you start mixing, you’ll notice the butter softening and sugars lightening in color, a good sign that everything’s coming together beautifully.
Step 2 — Heat, Stir, and Build Flavor
After mixing your dough, spread it evenly in your prepared pan. As it bakes, the kitchen fills with that warm, buttery aroma — you’ll see the edges browning gently while the center stays soft and inviting. This is a beautiful moment to pause, savor that toasty smell, and maybe even sneak a lick of leftover batter. Once baked, set the bars aside to cool — patience now pays off in luscious, creamy frosting later.
Step 3 — Finish and Taste-Test
Mix the peanut butter frosting until it’s perfectly smooth and spread it generously over the cooled cookie base — this is where the magic really takes shape. Sprinkle on the reserved Butterfinger bits and watch how they add shiny, crunchy glamour atop those creamy layers. When you cut into these bars, you’ll enjoy that ideal balance: soft, creamy, and crunchy. I always sample at least a couple bites here — just to make sure the frosting has set perfectly and the flavors sing together.
Pro Moves to Elevate It
Over the years, I’ve learned little tweaks that bring this Butterfinger Cookie Bars Recipe from really good to absolutely unforgettable. It’s all about paying attention to texture and timing, and having fun with the process.
- Heat Wisdom: Don’t overbake your cookie base; you want it golden but still tender in the middle, so it pairs perfectly with the creamy frosting on top.
- Timing Trick: Let the bars cool completely before frosting so your peanut butter spread stays beautifully smooth and doesn’t melt or slide off.
- Make-Ahead Strategy: These bars keep well in an airtight container for 3-4 days — perfect for prepping ahead for parties or weekday treats.
- Common Slip-Up: Skipping the parchment paper can make removal tricky; always line your pan to make slicing and serving a breeze.
Switch It Up: Creative Variations
While the classic Butterfinger Cookie Bars Recipe is delightful on its own, it’s also a superb base for fun twists. You might toss in some chopped pecans for a subtle nutty crunch or drizzle melted chocolate on top for a richer finish. Feeling festive? Add a sprinkle of sea salt on the frosting to amplify the sweet-and-salty vibe. These bars are like a blank canvas ready for your imagination!
When You’re Feeling Bold
For a bolder take, swap peanut butter for almond or cashew butter to change the flavor profile while keeping that creamy texture. You could even fold in mini chocolate chips or swirl caramel sauce into the frosting before it sets for a gooey surprise. Don’t be shy — your perfect Butterfinger Cookie Bars Recipe awaits your personal signature!
Storage & Reheating Tips
Store your Butterfinger Cookie Bars in an airtight container at room temperature for up to four days. If you want to keep them longer, wrap tightly and freeze for up to two months. Thaw bars overnight in the fridge, then bring to room temperature before enjoying. For a fresh-out-of-the-oven feel, briefly warm individual bars in the microwave for 10-15 seconds — just enough to soften the peanut butter frosting without melting it away.
Serving Inspiration

I love serving these bars with a chilled glass of milk or a cup of rich coffee to balance that sweetness perfectly. For a casual snack, just slice and stack – they make delightful hand-held bites. If you’re going for a more elegant presentation, try pairing with a scoop of vanilla ice cream or a drizzle of caramel sauce on the side. No matter how you serve them, Butterfinger Cookie Bars always steal the show.
Frequently Asked Questions
Absolutely! Almond butter or cashew butter can be used for a different but equally delicious flavor and creamy texture in the frosting.
Keep them in an airtight container at room temperature for up to four days, or freeze tightly wrapped for up to two months.
Yes, you can bake the cookie layer a day ahead and keep it wrapped. Frost just before serving for the best texture and appearance.
A 9×13-inch baking dish works perfectly to get that ideal thickness and bake time. If you use a different size, adjust baking time accordingly.
Notes & Handy Tools
You’ll want a good quality hand mixer to get the butter and sugars creamy without overworking your dough. Parchment paper is a must for easy removal and clean cutting. A sharp kitchen knife for chopping Butterfinger bars ensures even pieces so every bite gets that crunch. Lastly, an oven thermometer helps you keep the heat steady and spot-on for perfect golden bars every time.
PrintFull Recipe
Butterfinger Cookie Bars Recipe
Delicious Butterfinger Cookie Bars featuring a buttery cookie base mixed with chopped Butterfinger bars, topped with a creamy peanut butter frosting and more Butterfinger bits for an indulgent treat perfect for dessert or a sweet snack.
- Prep Time: 20 minutes
- Cook Time: 25 minutes
- Total Time: 45 minutes
- Yield: 16 servings
- Category: Dessert
- Method: Baking
- Cuisine: American
Ingredients
Cookie Base
- 1 cup unsalted butter (2 sticks), room temperature
- ½ cup sugar
- 1 cup brown sugar
- 2 eggs
- 1 teaspoon vanilla extract
- 2 ½ cups flour
- 1 teaspoon salt
- 1 teaspoon baking soda
- ½ cup Butterfinger bars, chopped (3 big sized bars)
Peanut Butter Frosting
- ¾ cup peanut butter
- 1 stick unsalted butter, room temperature
- 1 teaspoon vanilla extract
- 1 ½ cups powdered sugar
- 3 tablespoon milk
- 1 ½ cups Butterfinger bars, chopped (5 big sized bars) for topping
Instructions
- Preheat and Prepare: Preheat the oven to 350°F (177°C). Line a 9×13-inch baking dish with parchment paper and spray with cooking spray. Set aside.
- Cream Butter and Sugars: In a large bowl, add 1 cup of unsalted butter, sugar, and brown sugar. Use a hand mixer to beat until the mixture becomes light and creamy.
- Add Eggs and Vanilla: Add the eggs and 1 teaspoon vanilla extract to the bowl and continue beating until well combined.
- Combine Dry Ingredients: Add the flour, salt, and baking soda to the mixture. Beat on low speed with a hand mixer until everything is just combined.
- Mix in Butterfinger Bits: Fold in ½ cup chopped Butterfinger bars and mix gently to distribute evenly.
- Transfer and Bake: Scoop the dough into the prepared baking dish and spread evenly. Bake in the preheated oven for 25 minutes, or until golden brown around the edges.
- Cool Completely: Remove the baking dish from the oven and let the cookie base cool completely before frosting.
- Prepare Frosting: In a separate large bowl, beat ¾ cup peanut butter and 1 stick of unsalted butter using a hand mixer until smooth and creamy with no lumps.
- Add Vanilla and Sugar: Mix in 1 teaspoon vanilla extract. Then, gradually add 1 ½ cups powdered sugar and 3 tablespoon milk and continue beating until the frosting is smooth and spreadable.
- Frost and Top: Spread the peanut butter frosting evenly over the cooled cookie base. Sprinkle the remaining 1 ½ cups chopped Butterfinger bars on top for extra crunch and flavor.
- Slice and Serve: Slice the cookie bars into squares and serve. Enjoy your delicious Butterfinger Cookie Bars!
Notes
- Use room temperature butter and eggs to ensure better mixing and texture.
- Allow the cookie base to cool completely before frosting to prevent melting.
- You can substitute peanut butter with any nut or seed butter of choice if desired.
- Store the bars in an airtight container at room temperature for up to 3 days or refrigerate for longer freshness.
- For a crispier texture, bake an additional 5 minutes but monitor closely to prevent burning.


Leave a Reply