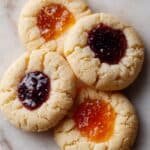
The holiday season simply isn’t complete without a batch of the Best Christmas Thumbprint Cookies Recipe warming the kitchen with its cozy, inviting aroma. These buttery, golden cookies crowned with jewel-toned jam are a festive classic — perfect for sharing at family gatherings or as a sweet treat for yourself after a chilly day outside. You’ll love how these little pockets of creamy dough and fruity filling melt in your mouth and make the whole room feel merry and bright.

Jump to:
- Meet the Magic Behind This Dish
- Why You’ll Love This
- The Essentials: Ingredients That Do the Work
- Step-by-Step: Bringing Best Christmas Thumbprint Cookies Recipe to Life
- Pro Moves to Elevate It
- Switch It Up: Creative Variations
- Storage & Reheating Tips
- Serving Inspiration
- Frequently Asked Questions
- Notes & Handy Tools
- Full Recipe
Meet the Magic Behind This Dish
This Best Christmas Thumbprint Cookies Recipe comes from my favorite holiday memories — the sound of laughter, the smell of freshly baked cookies, and the joy of biting into a tender cookie with a burst of sweet jam. What sets these cookies apart is their irresistibly soft texture with a slight toasty edge, combined with the vibrant fruit filling that feels like a little surprise in every bite. That first mouthful, warm and jammy, is pure holiday magic.
Why You’ll Love This
This is no ordinary cookie recipe — it’s your soon-to-be holiday staple that’s both effortlessly charming and truly delicious. These cookies strike that perfect balance of crisp edges meeting pillowy centers, each crowned with a luscious dollop of jam that blooms like a tiny festive jewel.
- Texture That Melts: You get a delicate crunch that gives way to a silky, melt-in-your-mouth dough.
- Flavor Layers You’ll Crave: The warm vanilla-forward cookie perfectly complements the bright, fruity jam.
- Quick to Master: Simple steps mean you’ll have these on your cookie tray in no time.
- Perfect Anytime Meal: Great with morning coffee, after-dinner tea, or as your festive dessert.
The Essentials: Ingredients That Do the Work

Let’s talk ingredients, because when you choose them right, every bite sings. I always use room temperature butter and egg—they blend perfectly to give those cookies a soft and creamy crumb. Picking a good quality vanilla and fresh jam really brightens the whole batch.
- Salted Butter: Using salted butter adds a nice balance to the sweetness and helps with that melt-in-the-mouth texture.
- Pure Vanilla Extract: Choose real vanilla for that rich, warm aroma that fills the kitchen.
Quick Note: Precise amounts and timing live in the recipe card at the end.
Step-by-Step: Bringing Best Christmas Thumbprint Cookies Recipe to Life
Step 1 — Gather, Chop, and Prep
Start by lining your baking sheets with parchment paper — this keeps the bottoms nice and even, and cleanup a breeze. Grab your mixer with a paddle attachment or a sturdy bowl and hand mixer. Softened butter is key here; it should be easy to press your finger into but not melting. As you cream your butter, sugar, and baking powder, you’ll notice the mixture turn creamier and lighter, signaling you’re ready for the next step.
Step 2 — Heat, Stir, and Build Flavor
Adding the egg and vanilla makes the dough shine with a warm, sweet aroma that already hints at the festive goodness to come. Slowly fold in the flour on low speed—it looks dry and crumbly at first, but that’s your dough forming. Avoid overmixing here; you want the cookies tender, not tough. When rolling the dough, I like to keep my hands lightly floured for easier shaping. The satisfying ‘press’ when making the thumb indentation feels like setting the stage for those gorgeous jam centers.
Step 3 — Finish and Taste-Test
Finally, filling each thumbprint with your chosen jam is where you make it yours. Spread it gently, slightly mounding so it doesn’t bake flat. When these babies bake, you’ll catch the scent of warm vanilla butter mingling with fruity sweetness — a total holiday hug. Let them cool a bit before attempting a taste test; this ensures the cookies set perfectly and won’t crumble in your hands. Once cooled, they’re pure joy with every bite.
Pro Moves to Elevate It
To push your Best Christmas Thumbprint Cookies Recipe from lovely to unforgettable, I've learned a few tricks along the way that I’m excited to share. These little insights will save you time, improve texture, and even boost flavor.
- Heat Wisdom: Keep your oven temperature steady and avoid opening the door too often to preserve cookie shape and even baking.
- Timing Trick: Rotate your baking sheet halfway through to prevent any hot spots from browning one side too much.
- Make-Ahead Strategy: You can prep dough balls and freeze them on a tray; just add extra baking time when you bake from frozen.
- Common Slip-Up: Don’t overfill the indentations with jam — a little goes a long way and keeps cookies from spreading too much.
Switch It Up: Creative Variations
Feeling adventurous with your Best Christmas Thumbprint Cookies Recipe? Swap out the raspberry or apricot jam for something unexpected — maybe tangy cranberry-orange marmalade or a smooth chocolate hazelnut spread. Add a sprinkle of finely chopped nuts on top for a toasty crunch, or infuse the dough with a pinch of cinnamon or ginger to deepen those warm flavors.
When You’re Feeling Bold
Try adding a splash of almond extract to the dough for an elegant lift, or dip half of each cookie in melted dark chocolate after baking for a decadent twist. Using a mix of jams in one batch also lets you create a colorful, festive platter sure to impress guests and delight your taste buds.
Storage & Reheating Tips
Once cooled, store your thumbprint cookies in an airtight container at room temperature — they’ll stay fresh for up to a week, though I rarely make it that long! For longer storage, freeze them in layers separated by parchment paper. To reheat, pop a few in a warm oven (around 300°F) for five minutes to rekindle that just-baked feel without drying them out.
Serving Inspiration

These cookies are a champ with your favorite holiday drinks — whether it's a cup of rich hot cocoa, a spiced mulled wine, or a fragrant chai latte. For casual family dessert, stack them on a festive platter alongside some fresh fruit and nuts. Want to dress them up? Try a dusting of powdered sugar or a drizzle of icing, and serve with a side of whipped cream or vanilla ice cream for a treat that’s both simple and elegant.
Frequently Asked Questions
Absolutely! While raspberry and apricot are classics, you can use any jam you love. Just choose one with good consistency so it doesn’t run too much during baking.
Make sure your butter is softened but not melted, and don’t overmix the dough. Chilling the dough balls before baking can also help maintain their shape.
With some substitutions like vegan butter and a gluten-free flour blend, you can adapt this recipe—though the texture and flavor might vary slightly. Experiment in small batches to find the balance you like.
Store in an airtight container at room temperature for up to a week or freeze for longer storage. Separate layers with parchment paper to keep them from sticking.
Notes & Handy Tools
A good baking sheet with low sides helps the cookies bake evenly without burning. Use parchment paper or silicone baking mats for easy release. A reliable stand mixer or hand mixer makes creaming the butter and sugar effortless, but a strong arm and a wooden spoon can do in a pinch. Lastly, a small cookie scoop helps form even-sized dough balls for uniform baking.
PrintFull Recipe
Best Christmas Thumbprint Cookies Recipe
These Best Christmas Thumbprint Cookies are buttery, soft, and filled with your choice of raspberry or apricot jam. Perfectly sized and richly flavored with vanilla, they make a delightful holiday treat that's easy to prepare and bake to golden perfection.
- Prep Time: 15 minutes
- Cook Time: 20 minutes
- Total Time: 35 minutes
- Yield: 24 servings
- Category: Dessert
- Method: Baking
- Cuisine: American
- Diet: Vegetarian
Ingredients
Cookies
- 0.5 teaspoon baking powder
- 1 large egg (at room temperature)
- 2 teaspoon pure vanilla extract
- 1 cup white sugar
- 1 cup salted butter (softened at room temperature)
- 2.5 cups all-purpose flour
Filling
- 1 cup jam (raspberry or apricot recommended)
Instructions
- Preheat Oven Start by preheating your oven to 325°F (165°C) to ensure it’s ready for baking.
- Cream Butter and Sugar In a stand mixer fitted with the paddle attachment, cream together 1 cup of salted butter, 1 cup of white sugar, and 0.5 teaspoon of baking powder on medium speed until the mixture is light and fluffy, about 3 to 4 minutes.
- Add Egg and Vanilla Scrape down the sides of the bowl, then add 1 large egg and beat well until fully incorporated. Add 2 teaspoons of pure vanilla extract and mix until combined.
- Incorporate Flour With the mixer on low speed, gradually add 2.5 cups of all-purpose flour. Mix until just barely combined to avoid overworking the dough.
- Shape Dough Balls Roll the dough into 1 inch diameter balls and place them at least 1 inch apart on a baking sheet to allow spreading.
- Create Indentations Immediately make an indentation in the center of each dough ball using your thumb or a rounded tool to create space for the jam filling.
- Fill with Jam Spoon about 1 cup of jam evenly into the indentations, slightly overfilling to accommodate spreading during baking.
- Bake Cookies Place the baking sheet in the preheated oven and bake for about 20 minutes. Rotate the sheet halfway through baking for even cooking.
- Cool Cookies Allow cookies to cool on the baking sheet for a few minutes, then transfer them to a wire rack to cool completely before serving.
Notes
- Use softened butter at room temperature for easier creaming and better texture.
- Do not overmix the dough after adding flour to keep cookies tender.
- Feel free to substitute jam flavors according to your preference.
- If dough is sticky, chill for 15 minutes before rolling.
- Rotate the baking sheet halfway during baking for even browning.
- Store cookies in an airtight container at room temperature for up to 1 week.

Leave a Reply