There’s nothing quite like the rich, velvety pull of coffee and chocolate coming together in a frozen treat, especially when it also packs a protein punch. This Ninja Creami Mocha Espresso Protein Ice Cream Recipe is one of my favorite ways to enjoy a cool, creamy delight that feels indulgent but fuels you too. Whether you’re cooling off after a long run or need a refreshing pick-me-up on a warm afternoon, this recipe hits all the right notes with that perfect balance of mocha goodness and frosty smoothness.
Jump to:
- Meet the Magic Behind This Dish
- Why You’ll Love This
- The Essentials: Ingredients That Do the Work
- Step-by-Step: Bringing Ninja Creami Mocha Espresso Protein Ice Cream Recipe to Life
- Pro Moves to Elevate It
- Switch It Up: Creative Variations
- Storage & Reheating Tips
- Serving Inspiration
- Frequently Asked Questions
- Notes & Handy Tools
- Full Recipe
Meet the Magic Behind This Dish
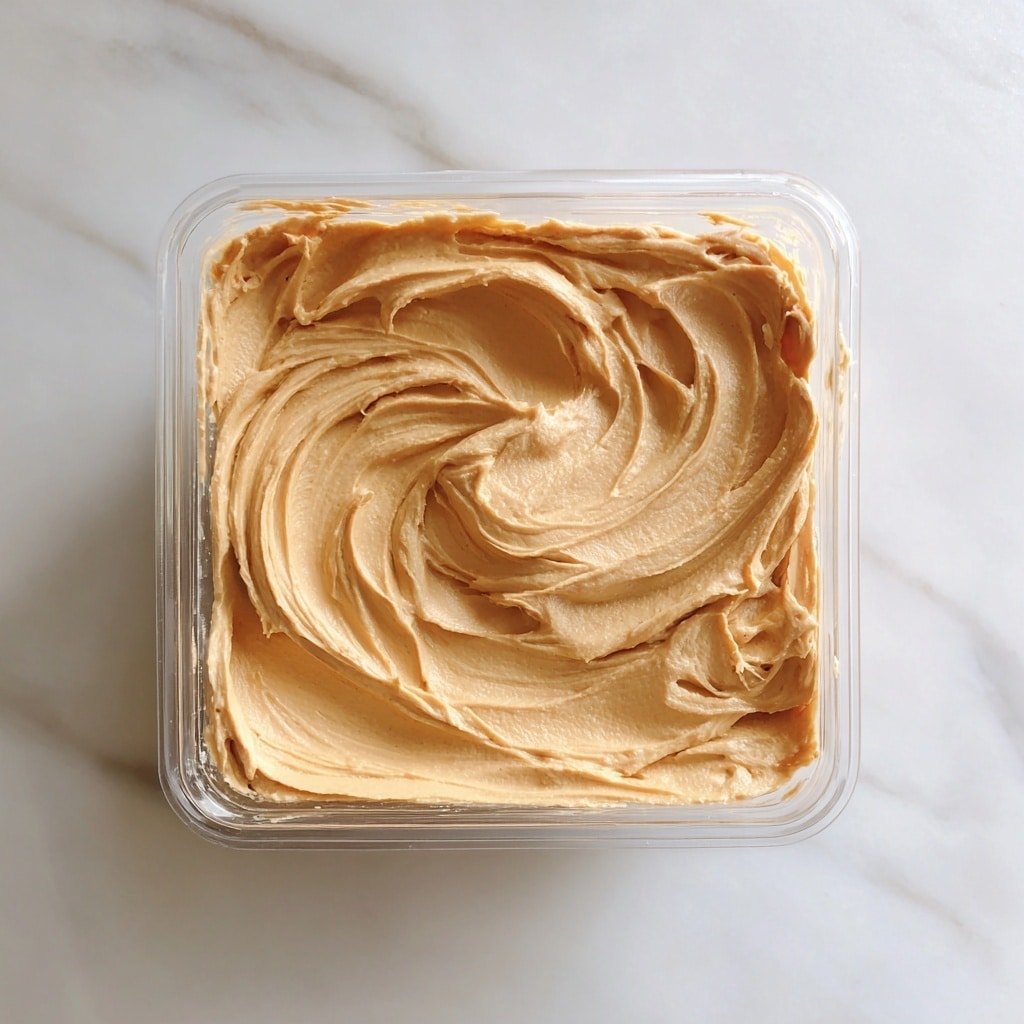
This Ninja Creami Mocha Espresso Protein Ice Cream Recipe sprang from my love of both coffee and quick, satisfying snacks after workouts. The secret? Combining real chilled espresso with chocolate protein powder creates a beautifully layered flavor that’s both robust and smooth without being overly sweet. You’ll notice the ice cream’s texture is luxuriously creamy with just a gentle toasty hint from the espresso that keeps you coming back for more.
Why You’ll Love This
I adore this ice cream because it feels indulgent but actually supports your day with protein and a real coffee buzz. It’s also incredibly easy, making it the perfect end-of-day treat or midday refresher.
- Texture That Melts: Silky and creamy, never icy or grainy when you spin it just right.
- Flavor Layers You’ll Crave: Rich espresso and smooth chocolate combine to satisfy both sweet and bitter cravings.
- Quick to Master: Minimal ingredients and simple steps, so you can whip it up with confidence any time.
- Perfect Anytime Meal: Great as a post-workout treat or a comforting dessert after dinner.
The Essentials: Ingredients That Do the Work

For this Ninja Creami Mocha Espresso Protein Ice Cream Recipe, each ingredient plays a crucial role. Think of the espresso as the flavor superstar, the chocolate protein powder as the creamy body, and the milk as the smooth base that ties everything together. Choosing high-quality ingredients will elevate your results tremendously.
- Chocolate Protein Powder: Opt for one with a clean taste and smooth texture; this keeps the ice cream rich without overwhelming sweetness.
- Espresso or Strong Coffee: Freshly brewed and chilled works best—its bold character is what makes the mocha stand out.
- Cocoa Powder: Adds depth and complexity; unsweetened is ideal to keep control over sweetness.
- Milk of Choice: Whole milk will give you creamier results, but I’ve had great luck with almond or oat milk for a lighter finish.
- Mix-ins (Optional): Mini chocolate chips or a swirl of nut butter add delightful texture and richness.
Quick Note: Precise amounts and timing live in the recipe card at the end.
Step-by-Step: Bringing Ninja Creami Mocha Espresso Protein Ice Cream Recipe to Life
Step 1 — Gather, Chop, and Prep
Start by pulling out your Ninja Creami pint container—it’s your best friend for this recipe. Assemble your protein powder, cocoa, and that all-important espresso, already chilled to avoid any melting troubles later. Whisk ingredients right in the pint or blend for about a minute until you get that smooth, glossy mixture with no clumps—take a moment to appreciate that rich chocolatey sheen before freezing.
Step 2 — Heat, Stir, and Build Flavor
Unlike traditional ice cream recipes requiring heating to make custard, this one skips that step to keep it quick and fresh. But if you want to amplify the mocha aroma, gently warming the espresso and cocoa together before combining with the protein and milk helps dissolve everything smoothly and intensifies those roasty, toasty notes. Just be sure to cool it down thoroughly before freezing. You’ll notice that warm espresso scent fills your kitchen—so comforting, like your favorite café moment.
Step 3 — Finish and Taste-Test
After freezing your pint overnight, run it through the Ninja Creami using the ‘Lite Ice Cream’ or ‘Ice Cream’ function. When it first comes out, check the texture — if it’s a little crumbly or dry, a quick re-spin softens it into a luscious, scoopable delight. This part always feels like a mini celebration because you’re so close! Then fold in those optional chocolate chips or a swirl of your favorite nut butter using the ‘mix-in’ feature. A quick taste at this point will show if you want to add a pinch more cocoa or coffee for a stronger kick.
Pro Moves to Elevate It
Mastering the Ninja Creami Mocha Espresso Protein Ice Cream Recipe is partly about getting to know your machine and developing your flavor intuition. I’ve learned these tricks that make every batch buttery smooth and decking out flavors that feel like a café creation.
- Heat Wisdom: Warm the espresso and cocoa just enough to dissolve, then cool before freezing—this step unlocks deeper mocha richness.
- Timing Trick: Freeze for a full 8+ hours to ensure a solid base; rushing this can give you icy chunks instead of creamy bliss.
- Make-Ahead Strategy: Prep your pint ahead and keep it in the freezer so you always have a quick, protein-packed treat ready.
- Common Slip-Up: Don’t skip the re-spin if it looks crumbly—giving it a second whirl transforms texture like magic.
Switch It Up: Creative Variations
If you’re craving a little adventure with this Ninja Creami Mocha Espresso Protein Ice Cream Recipe, there’s plenty of room to play. Try blending in a teaspoon of cinnamon or cayenne for a warm spice kick. Or go tropical by swapping espresso for coconut cold brew—yes, that exists and it’s surprisingly delicious! You can also experiment with your protein powder flavors; vanilla pairs wonderfully with mocha, giving a lighter, sweeter spin.
When You’re Feeling Bold
Crank up the bold factor by using espresso powder in addition to the cold brew for an ultra-intense coffee flavor. Swap your chocolate protein for mocha or caramel flavors to create layers of taste. And if texture’s your game, toss in crushed espresso beans or toasted coconut flakes as mix-ins for delightful crunch. You’re only limited by your cravings here—this recipe is your canvas!
Storage & Reheating Tips
This Ninja Creami Mocha Espresso Protein Ice Cream keeps beautifully in the freezer for up to two weeks. To thaw, just set it in the fridge for about 10-15 minutes or let it sit at room temperature for a few minutes to soften slightly. If it firms up too much, a brief re-spin in the Ninja Creami brings it back to scoopable perfection without losing any flavor or creaminess.
Serving Inspiration

I love serving this mocha espresso protein ice cream with a drizzle of warm caramel sauce for casual comfort or alongside a fresh berry compote for a sophisticated contrast. It’s excellent on its own, but if you want a little extra indulgence, try pairing with biscotti or almond cookies for a toasty crunch. A homemade almond milk latte served on the side makes it a dreamy café-style experience right at home.
Frequently Asked Questions
Yes, you can substitute strong brewed coffee if you don’t have espresso. Just make sure it’s chilled and quite strong to maintain that bold mocha flavor.
A chocolate-flavored whey or plant-based protein powder with a smooth, mild taste pairs beautifully. Avoid powders with strong aftertastes or excessive sweetness.
Absolutely! Use any plant-based milk you prefer, like oat, almond, or coconut milk. Each adds its own subtle flavor and can be swapped depending on your needs.
Freeze your mixture for at least 8 hours or overnight. This ensures the mixture is fully solid for the Ninja Creami to create that perfect creamy texture.
Notes & Handy Tools
Having a good whisk or blender for smooth mixing is key, and obviously, the Ninja Creami itself is essential here. I recommend silicone spatulas for scraping every last bit into the pint—and a fine mesh sieve if you want extra assurance against lumps in your blend. A digital kitchen scale helps with accuracy, especially if you’re tweaking protein amounts for your macros.
PrintFull Recipe
Ninja Creami Mocha Espresso Protein Ice Cream Recipe
This Ninja Creami Mocha Espresso Protein Ice Cream is a delicious and creamy treat that combines rich chocolate and bold espresso flavors with the added protein boost. Perfect as a healthy dessert or post-workout snack, this recipe utilizes the Ninja Creami to create a smooth, scoopable ice cream with optional mix-ins like mini chocolate chips or nut butter.
- Prep Time: 10 minutes
- Cook Time: 0 minutes
- Total Time: 8 hours 10 minutes
- Yield: 4 servings
- Category: Dessert
- Method: Blending
- Cuisine: American
- Diet: Low Fat
Ingredients
Main Ingredients
- 1 scoop chocolate protein powder
- 1 spoonful cocoa powder
- ½ cup chilled espresso or strong coffee
- 1 cup milk of choice (dairy or non-dairy)
Optional Mix-ins
- mini chocolate chips
- nut butter
Instructions
- Combine Ingredients: Add the chocolate protein powder, cocoa powder, chilled espresso, and milk of choice to a Ninja Creami pint container.
- Mix Until Smooth: Whisk or blend the mixture well to ensure there are no lumps and the mixture is smooth.
- Freeze the Mixture: Place the pint in the freezer and freeze overnight for at least 8 hours until it is completely solid.
- Create Ice Cream: Insert the pint into the Ninja Creami machine and process it using the 'Lite Ice Cream' or 'Ice Cream' setting for a creamy texture.
- Adjust Texture: If the ice cream is too dry or crumbly, run the pint through the machine again to re-spin and achieve a creamier consistency.
- Add Mix-ins: Stir in optional mini chocolate chips or nut butter, then use the ‘mix-in’ feature on the Ninja Creami to evenly incorporate them.
- Serve: Scoop the ice cream into bowls or cones, serve immediately, and enjoy your mocha espresso protein treat.
Notes
- Use chilled espresso or strong coffee for best flavor and to keep the mixture cold before freezing.
- You can substitute milk with any plant-based or dairy milk depending on dietary preferences.
- If you don't have a Ninja Creami, alternatively blend the frozen mixture in a high-speed blender and freeze again for a similar effect.
- Add mix-ins according to your preference for texture and flavor contrast.
- For a richer ice cream, use whole milk or add a splash of cream if desired.
- Make sure the mixture is fully frozen overnight for optimal ice cream consistency.

Leave a Reply