There's something truly enchanting about baking a cake that feels like a hug in dessert form. This Delicious Festive Pink Velvet Cake Recipe is just that — a beautiful, soft, and cozy treat bursting with delicate flavors and a lovely blush pink hue that’s perfect for celebrations or any day you want to make extra special. Whether you're gathering with friends, marking a holiday, or just craving something sweetly inviting, this cake delivers a slice of joy in every bite.
Jump to:
- Meet the Magic Behind This Dish
- Why You’ll Love This
- The Essentials: Ingredients That Do the Work
- Step-by-Step: Bringing Delicious Festive Pink Velvet Cake Recipe to Life
- Pro Moves to Elevate It
- Switch It Up: Creative Variations
- Storage & Reheating Tips
- Serving Inspiration
- Frequently Asked Questions
- Notes & Handy Tools
- Full Recipe
Meet the Magic Behind This Dish
I stumbled upon the inspiration for this Delicious Festive Pink Velvet Cake Recipe one chilly winter morning when I craved something both classic and a little unexpected. What makes this cake genuinely unique is its light, airy crumb paired with that subtle pink tint — not overly sweet, but with a creamy richness that melts in your mouth. You’ll notice the softness hits you instantly, as if this cake was made to be savored slowly, wrapped in warm memories.
Why You’ll Love This
This cake radiates festive charm with its gentle pink color and luscious texture — it’s a perfect centerpiece that tastes as wonderful as it looks. Plus, it’s surprisingly straightforward to make, which gives you more time to enjoy the process and less stress in the kitchen.
- Texture That Melts: You'll get a tender crumb that’s fluffy yet richly moist.
- Flavor Layers You’ll Crave: A gentle balance of sweet creaminess and a whisper of vanilla that never overwhelms.
- Quick to Master: Clear, step-by-step guidance makes this recipe friendly even if you’re new to baking layered cakes.
- Perfect Anytime Meal: It fits holiday tables and cozy afternoons alike — a versatile star of any occasion.
The Essentials: Ingredients That Do the Work

Picking the right ingredients really sets the stage for your Delicious Festive Pink Velvet Cake Recipe. I always recommend fresh eggs and full-fat dairy to keep the texture rich and luscious. Also, choosing a good-quality red food coloring (or natural alternatives like beet powder) will give you that vibrant pink without compromising flavor.
- Buttermilk: Adds a slight tang that tenderizes the crumb beautifully.
- Cream Cheese: The key to a silky, flavorful frosting that balances sweetness and tang.
- Pure Vanilla Extract: Use the real thing—it elevates every bite with warmth and depth.
- Baking Soda & Baking Powder: Both work together to create that lovely rise and soft texture you'll notice.
Quick Note: Precise amounts and timing live in the recipe card at the end.
Step-by-Step: Bringing Delicious Festive Pink Velvet Cake Recipe to Life
Step 1 — Gather, Chop, and Prep
Start by assembling your mixing bowls, measuring cups, and electric mixer—or whip it old school with a sturdy whisk if you’re in the mood for a workout! Grease and line your round cake pans with parchment paper so your cakes pop out beautifully after baking. Beat your softened butter until creamy; you’ll notice it fluff up slightly, which is a good sign you’re on track for a silky batter ahead.
Step 2 — Heat, Stir, and Build Flavor
Once you add sugar to the butter, watch as the mixture lightens to a dreamy pale yellow and smells sweetly buttery. Gently fold your pink coloring and extracts in, swooshing layers of scent and color through the batter. Alternate the dry ingredients with your milk mixture carefully — this keeps the batter from getting tough and ensures a soft crumb. Hearing the gentle hum of the mixer at this stage always makes me feel like I’m creating something truly special.
Step 3 — Finish and Taste-Test
After your cakes bake to golden perfection and cool on wire racks, it’s time for the fun part: frosting! I find the cream cheese frosting adds that perfect tangy contrast, making each bite irresistible. Spread it thickly between layers and all over the cake — a cozy, creamy blanket. If you need to taste a little frosting here, don’t hesitate; it’s all part of the quality control!
Pro Moves to Elevate It
Having nailed the basics, here are a few quick tips I've picked up to ensure your Delicious Festive Pink Velvet Cake Recipe looks and tastes professional every time. The little details make a big difference in delivering that cozy wow factor.
- Heat Wisdom: Bake your layers evenly by positioning your oven rack in the center to avoid too much browning.
- Timing Trick: Let the cake layers cool fully before frosting—you’ll avoid a melty mess and keep the frosting beautifully smooth.
- Make-Ahead Strategy: Bake your layers a day ahead and wrap them tightly in plastic wrap for easy assembly next day.
- Common Slip-Up: Don’t overbeat the batter after adding flour—it can lead to a dense texture, so mix just to combine.
Switch It Up: Creative Variations
If you’re craving a twist or want to surprise your guests, the Delicious Festive Pink Velvet Cake Recipe adapts beautifully. Spice it up with a hint of ground cardamom or swap the cream cheese frosting for a whipped coconut cream for dairy-free goodness. Adding a handful of fresh raspberries between layers brings a fresh burst that lifts every bite.
When You’re Feeling Bold
Go ahead and be daring: try mixing pistachio paste into the batter for a nutty undertone or swirl in some melted white chocolate for extra indulgence. You can even add edible glitter or rose petals on top for a stunning presentation that turns this cake into your signature showstopper.
Storage & Reheating Tips
Keep your cake fresh by storing it in an airtight container at room temperature if serving within two days. For longer storage, pop it in the fridge for up to five days; just bring it back to room temp before slicing for the best texture. Freeze any leftovers wrapped tightly in plastic and foil—thaw overnight in the fridge, then enjoy that creamy softness all over again.
Serving Inspiration
This cake shines alongside a cup of aromatic tea or a chilled glass of sparkling rosé. For casual gatherings, slice it thick and serve on colorful plates with fresh berries. For special occasions, add a drizzle of raspberry coulis and a sprig of mint to each slice for a classy, photo-ready dessert experience.
Frequently Asked Questions
Absolutely! Swap out butter for coconut oil, use a plant-based cream cheese alternative, and choose coconut or almond milk. Adjust egg substitutes like flax eggs to keep the texture tender.
You can use natural colorants like beetroot powder or pomegranate juice to achieve a lovely pink hue. Add a small amount gradually to avoid altering the cake’s flavor too much.
Wrap the cake tightly in plastic wrap or keep in an airtight container. It will stay fresh for up to 5 days in the fridge. For longer storage, freeze wrapped slices and thaw overnight before serving.
Definitely! Reduce baking time to about 18-20 minutes and keep an eye on them for doneness. Cupcakes are a fun, portable way to enjoy this cake’s festive flavors.
Notes & Handy Tools
A standard 9-inch round cake pan set is a must-have for this recipe to get those perfectly even layers. I also swear by a good offset spatula for smoothly spreading frosting, and a serrated knife to trim domes evenly. Lastly, a stand mixer speeds things up, but a handheld mixer works just fine for home bakers.
PrintFull Recipe
Delicious Festive Pink Velvet Cake Recipe

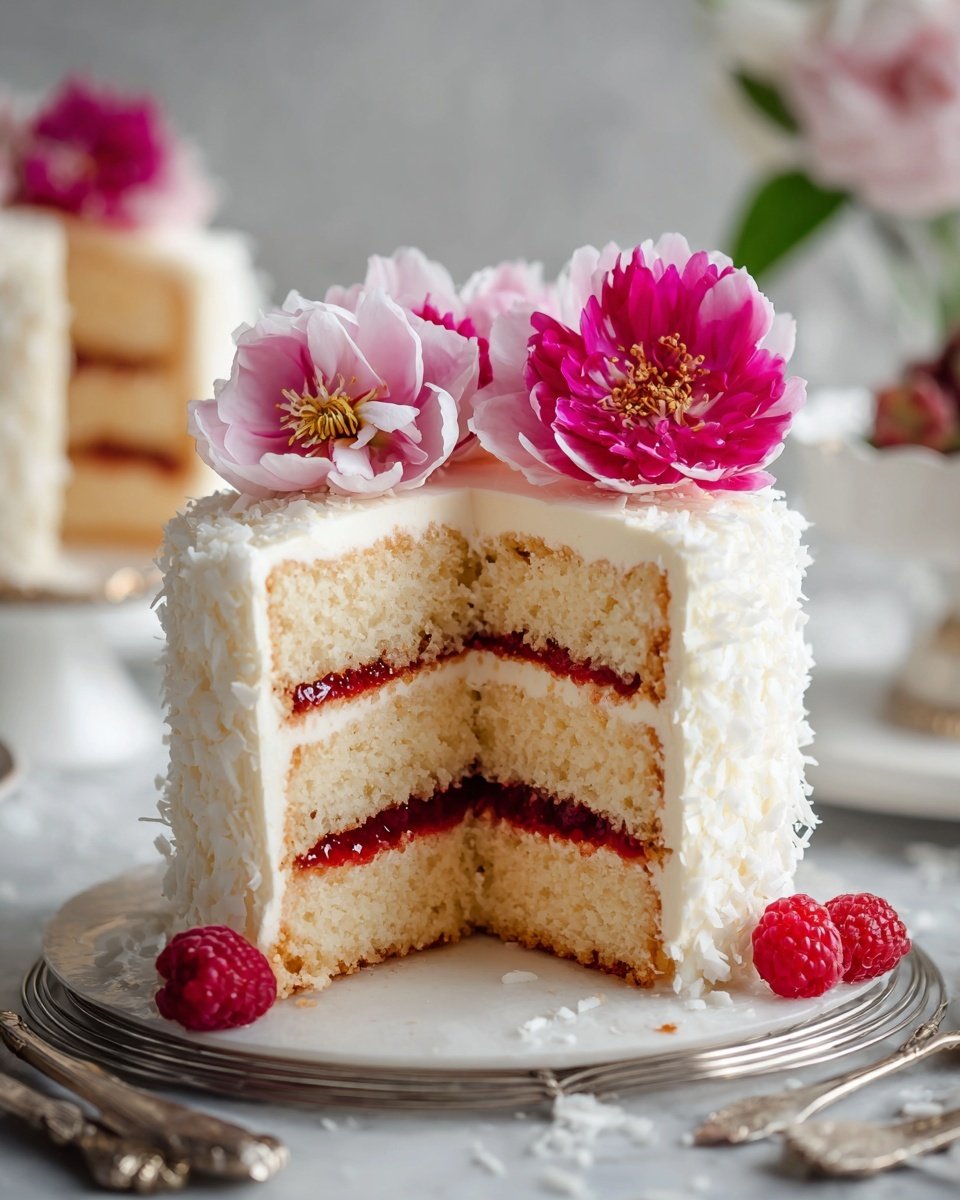
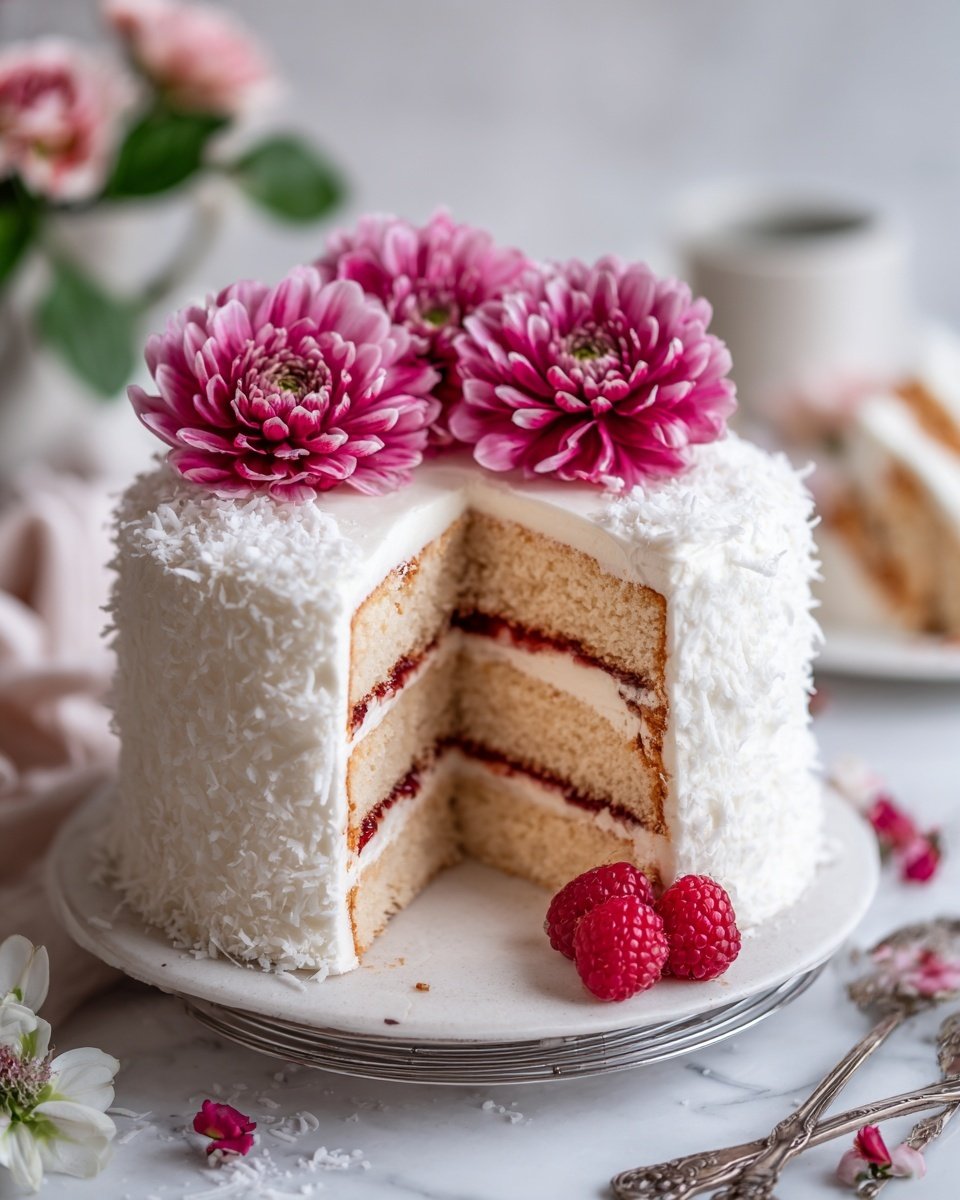
This luscious Raspberry Swirl Coconut Snowball Cake features moist layers of coconut-infused cake paired with a rich cream cheese frosting swirled with raspberry preserves. The cake is coated with shredded coconut, offering a delightful tropical flavor and snowy appearance, perfect for special occasions or a decadent treat.
- Prep Time: 40 minutes
- Cook Time: 20 minutes
- Total Time: 1 hour
- Yield: 12 servings
- Category: Dessert
- Method: Baking
- Cuisine: American
- Diet: Vegetarian
Ingredients
Cake Ingredients
- 2 and ½ cups (310 grams) all-purpose flour
- 1 Tablespoon (13 grams) baking powder
- ½ teaspoon (2 grams) baking soda
- ¾ teaspoon (4 grams) salt
- ½ cup (113 grams) unsalted butter, softened to room temperature
- 1 and ½ cups (298 grams) granulated sugar
- 1 teaspoon vanilla extract
- 1 and ½ teaspoons coconut extract
- ¼ teaspoon almond extract
- 6 large egg whites, lightly beaten until foamy on top
- 1 cup (227 grams) canned coconut milk
- ½ cup (113 grams) sour cream, at room temperature
- ⅓ cup (67 grams) unrefined coconut oil, liquified
- 1 cup (54 grams) unsweetened shredded coconut
Frosting Ingredients
- 1 cup (226 grams) unsalted butter, at room temperature
- 8 ounces cream cheese, at room temperature
- 1 teaspoon vanilla extract
- ¼ teaspoon salt
- ½ teaspoon coconut extract
- 3 Tablespoons canned coconut milk
- 4 and ½ cups (510 grams) confectioners’ sugar
- ½ cup raspberry preserves
- 2 cups (108 grams) shredded coconut, for decorating
Instructions
- Prepare pans and preheat oven: Preheat the oven to 350 degrees F. Generously grease the bottoms and sides of three 9-inch round cake pans and line with parchment paper rounds. Set aside.
- Mix dry ingredients: In a large bowl, sift together the flour, baking powder, baking soda, and salt. Set aside.
- Cream butter and sugar: Using a stand mixer with paddle attachment or hand mixer, beat softened butter on medium-high speed until smooth and creamy, about 1 minute. Gradually add granulated sugar and beat on high speed for 2 minutes until light and fluffy.
- Add extracts: Beat in vanilla extract, coconut extract, and almond extract.
- Add egg whites: Reduce mixer speed to low and add the lightly beaten egg whites in three additions, beating well after each and scraping down the bowl sides frequently.
- Combine wet ingredients: In a spouted measuring cup, mix coconut milk with sour cream until even.
- Incorporate dry and wet mixtures: On low speed, add the flour mixture in three parts alternated with the coconut milk and sour cream mixture, starting and ending with the flour. Mix until just combined.
- Add oil and coconut: Add liquified coconut oil and beat until just combined. Fold in unsweetened shredded coconut with a rubber spatula until evenly mixed.
- Divide batter and bake: Evenly divide the batter among the three prepared pans (approximately 510 grams per pan). Smooth the tops and bake for 20 minutes or until edges are lightly browned and a toothpick inserted in the center comes out clean.
- Cool cake layers: Let the cakes cool in the pans set on wire racks for 20 minutes. Then invert each onto cooling racks and cool completely.
- Make frosting: Beat unsalted butter and cream cheese on medium-high speed until smooth, about 2 minutes. Add vanilla, salt, coconut extract, and canned coconut milk. Reduce speed to low and gradually add sifted confectioners' sugar in ¼ cup increments, beating well after each addition. Increase mixer speed to high and beat for 2 minutes until very fluffy.
- Trim cake layers: Using a serrated knife, trim any domed tops off each cake layer, removing uneven surfaces for stacking.
- Assemble cake: Place one cake layer on a plate or cake stand. Spread 1 cup of frosting evenly over the top, then spread ¼ cup raspberry preserves on top of the frosting.
- Layer cakes: Add the second cake layer and repeat spreading 1 cup frosting and ¼ cup raspberry preserves. Top with the final cake layer.
- Frost entire cake: Spread the remaining frosting evenly over the top and sides of the assembled cake.
- Decorate with coconut: Gently press shredded coconut around the cake sides with your hands and generously sprinkle remaining shredded coconut over the top.
- Set and serve: Allow the cake to set for 30 minutes at room temperature before slicing and serving.
Notes
- Ensure egg whites are beaten lightly until just foamy to help create a light texture without over-beating.
- If you don’t have unrefined coconut oil, melted regular coconut oil or a neutral vegetable oil can be substituted.
- For best results, use cream cheese and butter at room temperature to ensure smooth frosting.
- You can substitute raspberry preserves with other berry preserves but raspberry enhances the tropical flavor nicely.
- Chilling the cake for 30 minutes before serving helps the frosting set and makes slicing easier.
- Storing the cake in the refrigerator is recommended if not serving immediately; allow cake to come to room temperature before serving for best texture.

Leave a Reply