There’s something irresistible about crispy, golden rice paired with creamy, spicy tuna that just hits all the right notes. This Restaurant-Worthy Spicy Tuna Crispy Rice At Home! Recipe captures that perfect combo of crunch and lusciousness that you usually only find at high-end sushi spots. Whether it’s a cozy night treating yourself or impressing friends over drinks, this recipe will bring a little sushi bar magic straight into your kitchen.
Jump to:
- Meet the Magic Behind This Dish
- Why You’ll Love This
- The Essentials: Ingredients That Do the Work
- Step-by-Step: Bringing Restaurant-Worthy Spicy Tuna Crispy Rice At Home! Recipe to Life
- Pro Moves to Elevate It
- Switch It Up: Creative Variations
- Storage & Reheating Tips
- Serving Inspiration
- Frequently Asked Questions
- Notes & Handy Tools
- Full Recipe
Meet the Magic Behind This Dish
I first fell in love with the idea of crispy rice topped with spicy tuna on a trip to my favorite sushi spot, where the textures and flavors seemed to dance in perfect harmony. What makes this Restaurant-Worthy Spicy Tuna Crispy Rice At Home! Recipe truly unique is that irresistible contrast: golden, toasty rice bites that give way to a creamy, warmly spiced tuna topping. The secret feels like a little fairy dust sprinkled over the dish — it’s all about that first crunch mingling with a burst of vibrant flavor.
Why You’ll Love This
This recipe blends a handful of simple ingredients to create a dish that feels both indulgent and approachable. You’re not just making sushi — you’re crafting a sensory experience that’s as satisfying to make as it is to devour.
- Texture That Melts: Crispy, golden rice squares paired with creamy, cooling tuna mix.
- Flavor Layers You’ll Crave: The perfect balance of spicy heat, umami, and a hint of sweetness in every bite.
- Quick to Master: Simple steps that even busy cooks can handle without stress.
- Perfect Anytime Meal: Great as a snack, appetizer, or light dinner — your guests won’t stop asking for more.
The Essentials: Ingredients That Do the Work

Choosing the right ingredients is your first step toward nailing this Restaurant-Worthy Spicy Tuna Crispy Rice At Home! Recipe. Think fresh, quality items that bring out the best flavors and textures. It’s simpler than you might expect, but these little details make a world of difference.
- Sushi-grade tuna: Freshness is key. Look for bright, firm fish with a clean scent — this will make your spicy tuna topping shine.
- Short-grain sushi rice: The sticky texture holds together perfectly for crispy rice cubes that don’t fall apart.
Quick Note: Precise amounts and timing live in the recipe card at the end.
Step-by-Step: Bringing Restaurant-Worthy Spicy Tuna Crispy Rice At Home! Recipe to Life
Step 1 — Gather, Chop, and Prep
Start with the basics: have your sushi rice cooked, cooled, and ready to go. I love using a sharp knife to finely dice the tuna into smooth little cubes — the goal is a silky but structured texture. Gather your mixing bowls, silicone spatula, and a non-stick pan that’ll give you that beautiful golden crust without sticking. You’ll know you’re ready when the tuna smells fresh and the rice feels slightly sticky but not wet.
Step 2 — Heat, Stir, and Build Flavor
Heat your pan on medium-high until it’s warmly shimmering, then add your shaped rice cubes. The sizzle you hear is the promise of that toasty gold crust forming—don’t rush this part! Flip carefully to brown all sides evenly. Meanwhile, gently fold your chopped tuna with spicy mayo, scallions, and a splash of soy sauce. The aroma of sesame oil mingling with fresh sushi-grade tuna is enough to make anyone’s mouth water.
Step 3 — Finish and Taste-Test
Once the rice cubes are crunchy and evenly golden, spoon on that luscious spicy tuna mix, layering it just right so each bite gets a creamy hit. A quick sprinkle of toasted sesame seeds or tiny nori strips adds a lovely finishing touch. Before serving, always sneak a taste — you might want to adjust a little more heat or a splash of citrus to brighten things up. This is your moment to make it perfectly yours.
Pro Moves to Elevate It
A few tricks I’ve picked up can really take your Restaurant-Worthy Spicy Tuna Crispy Rice At Home! Recipe from great to show-stopping. It’s all about mastering your heat control and timing so every element sings in harmony.
- Heat Wisdom: Keep your pan moderately hot to get that crisp crust without burning the rice.
- Timing Trick: Let the rice cubes rest a minute off heat after frying — this helps keep them crunchy when topped.
- Make-Ahead Strategy: Prepare the spicy tuna mix up to a day before for quicker assembly and deeper flavor melding.
- Common Slip-Up: Avoid soggy rice by ensuring the rice is well-drained and cooled before shaping and frying.
Switch It Up: Creative Variations
One of the best things about this Restaurant-Worthy Spicy Tuna Crispy Rice At Home! Recipe is how adaptable it is. Want to play with bold flavors or ingredient swaps? Try adding a bright mango salsa topping or swapping tuna for spicy crab or salmon to change the flavor profile while keeping that crave-worthy texture combo.
When You’re Feeling Bold
If you’re ready to dial up the excitement, toss in some finely diced jalapeños for extra heat or a drizzle of truffle oil to add luxe depth. Crispy rice squares are a brilliant canvas, and the spicy tuna mix can handle adventurous twists like ginger, wasabi, or crunchy tempura flakes.
Storage & Reheating Tips
This dish is definitely best enjoyed fresh, but if you have leftovers, store the spicy tuna separately in an airtight container for up to 24 hours. The crispy rice cubes keep their crunch best when kept in a paper towel-lined container in the fridge for a day. To reheat, pop the rice cubes in a hot, dry pan to refresh their crispiness, then top with cold tuna just before serving.
Serving Inspiration

For a laid-back night, serve these crispy rice bites alongside a chilled cucumber salad and a light drizzle of soy sauce. When you want to impress, plate them with microgreens, pickled ginger, and a side of ponzu dipping sauce. A crisp white wine or a cold Japanese beer pairs effortlessly, making the experience feel elevated yet relaxed.
Frequently Asked Questions
Absolutely! Salmon or cooked crab make excellent alternatives that still offer rich flavor and texture.
Make sure the rice is thoroughly chilled and gently pressed into compact cubes before frying. Use a non-stick pan and a little oil over medium-high heat for best results.
Yes! Swap the spicy tuna with mashed avocado mixed with vegan sriracha mayo and chopped cucumber for a delightful plant-based version.
It has a balanced heat that can be adjusted easily by tweaking the amount of chili sauce or sriracha you use, so feel free to customize it to your taste!
Notes & Handy Tools
Sharp chef’s knife for clean tuna cuts, non-stick frying pan for crisping rice, silicone spatula to gently flip your cubes, and a bamboo sushi mat or molds help shape the rice neatly. Also, having good quality spicy mayo or making your own is a game changer for authentic flavor.
PrintFull Recipe
Restaurant-Worthy Spicy Tuna Crispy Rice At Home! Recipe

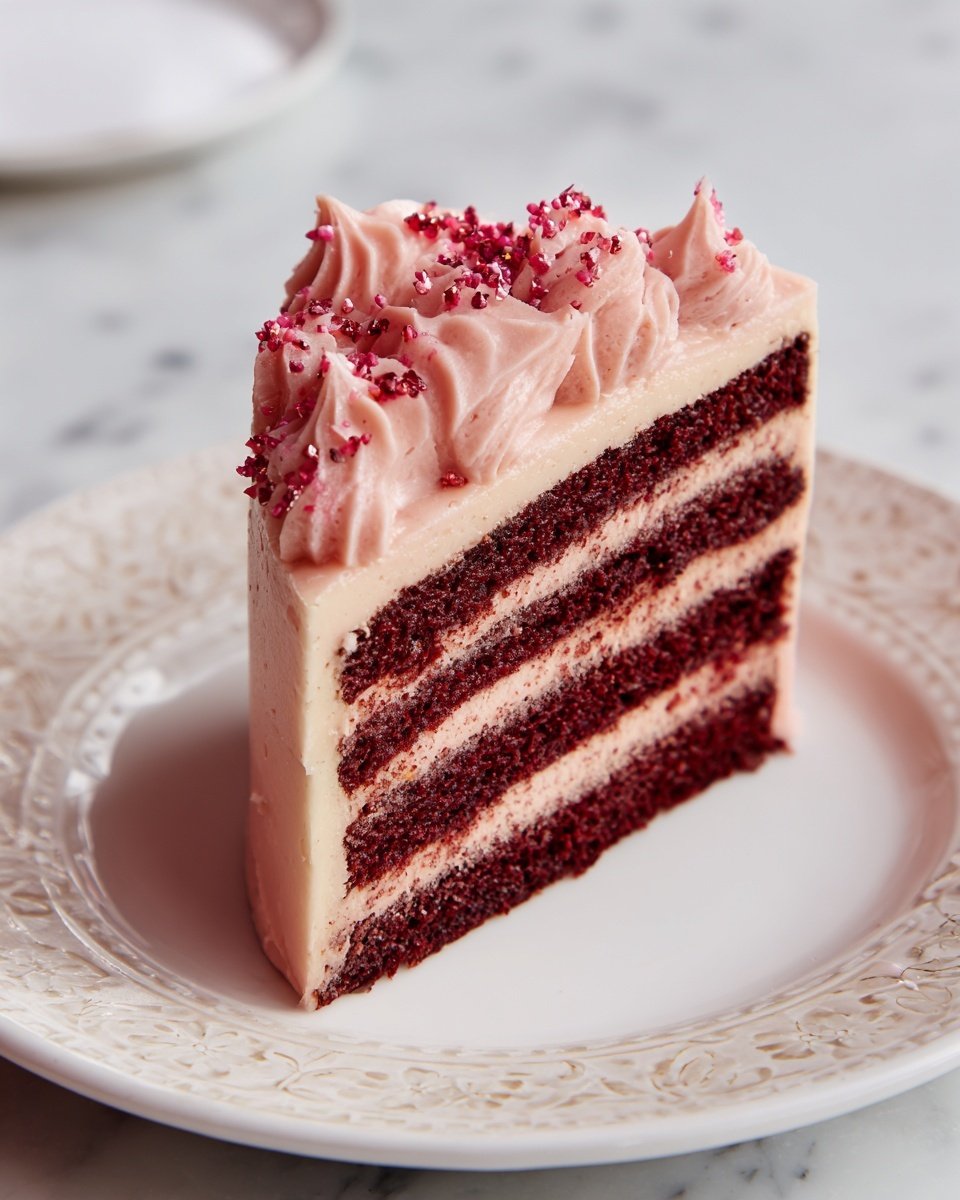
This Delicious Festive Pink Velvet Cake is a vibrant, moist, and tender dessert perfect for celebrations. Featuring tender layers infused with a hint of tang from buttermilk and a vibrant pink hue, it is paired with a creamy, tangy cream cheese frosting that complements the cake's delicate flavor. Ideal for birthdays, parties, or any festive occasion, this cake combines classic baking techniques with festive flair.
- Prep Time: 20 minutes
- Cook Time: 30 minutes
- Total Time: 50 minutes
- Yield: 12 servings
- Category: Dessert
- Method: Baking
- Cuisine: American
Ingredients
Cake Layers:
- 2 ½ cups all-purpose flour
- 1 ½ cups granulated sugar
- 1 teaspoon baking soda
- 1 teaspoon baking powder
- ½ teaspoon salt
- 1 cup unsalted butter, softened
- 4 large eggs
- 1 cup buttermilk (or milk with 1 tablespoon lemon juice)
- 2 teaspoon vanilla extract
- 2 tablespoon red or pink food coloring
- ½ cup unsweetened applesauce or plain yogurt
Frosting:
- 1 cup cream cheese, softened
- ½ cup unsalted butter, softened
- 3 cups powdered sugar
- 1 teaspoon vanilla extract
Instructions
- Preheat Oven and Prepare Pans: Preheat your oven to 350°F (175°C). Grease and flour two 9-inch round cake pans, then line them with parchment paper to ensure the cakes release easily after baking.
- Mix Dry Ingredients: In a large bowl, sift together the all-purpose flour, baking soda, baking powder, and salt. Whisk to combine all the dry ingredients evenly.
- Cream Butter and Sugar: In a separate large mixing bowl, cream the softened unsalted butter and granulated sugar together until the mixture is light and fluffy, which should take about 3 to 4 minutes using an electric mixer.
- Add Eggs and Vanilla: Beat in the eggs one at a time, ensuring each egg is fully incorporated before adding the next. Then mix in the vanilla extract, scraping down the sides of the bowl as needed to mix thoroughly.
- Combine Wet and Dry Ingredients: Gradually add the dry ingredients to the creamed butter mixture, alternating with the buttermilk. Begin and end with the dry ingredients, mixing gently after each addition until just combined.
- Add Color and Applesauce: Stir in the red or pink food coloring and the unsweetened applesauce (or plain yogurt) until the batter is evenly colored and smooth.
- Divide Batter and Bake: Evenly divide the batter between the two prepared pans. Place in the preheated oven and bake for 30 minutes, rotating the pans halfway through to ensure even baking. A toothpick inserted into the center should come out clean when done.
- Cool Cakes: Let the cakes cool in the pans for 10 minutes. Then carefully remove from pans and transfer to wire racks to cool completely before frosting.
- Prepare Frosting: Beat the softened cream cheese and unsalted butter together until smooth and creamy. Gradually add the powdered sugar, mixing well after each addition. Finally, add the vanilla extract and continue mixing until the frosting is fluffy and spreadable.
- Assemble Cake: Place one cooled cake layer on a serving plate. Spread an even layer of frosting over the top. Place the second cake layer on top and frost the top and sides of the entire cake. Smooth the frosting or pipe it decoratively as desired.
- Decorate: Add festive decorations such as sprinkles, edible flowers, or a dusting of powdered sugar to enhance its appearance and make it perfect for any festive occasion.
Notes
- Use room temperature ingredients for better mixing and texture.
- Substitute buttermilk with milk plus 1 tablespoon lemon juice or vinegar, let it sit for 5 minutes before using.
- For a vegan version, replace eggs with flax eggs and use dairy-free butter and cream cheese substitutes.
- Ensure not to overmix batter to maintain a tender crumb.
- Rotate pans halfway during baking to ensure even cooking.
- Store the cake refrigerated and bring it to room temperature before serving for best flavor.


Leave a Reply