There’s something truly comforting about waking up to a warm, golden bake that fills your kitchen with sweet creaminess and the bright zing of fresh fruit. This Lemon Rolls Recipe hits that perfect note between cozy and refreshing, making it an ideal treat for weekend brunch, holiday mornings, or any time you want to impress without stress. As the rolls rise and the aroma of citrus and buttery dough swirl around you, you’ll find it hard not to smile.

Jump to:
Meet the Magic Behind This Dish
I stumbled upon this Lemon Rolls Recipe one chilly morning when I wanted something that felt like a warm hug and a sunny day all at once. What sets these rolls apart is the way the lemon filling balances tart and sweet in the creamiest, softest dough you can imagine. You'll notice as you slice into them a swirl of bright lemon curd tucked inside, crowned by a toasty, golden top that beckons you for the first bite.
Why You’ll Love This
This Lemon Rolls Recipe isn’t just about flavor — it’s about delivering texture, aroma, and ease that turn your breakfast or snack into a little celebration.
- Texture That Melts: Soft, pillowy dough meets a creamy, tangy lemon filling that feels like a bite of sunshine.
- Flavor Layers You’ll Crave: Bright citrus zest mingled with buttery richness gives each roll a perfect balance.
- Quick to Master: A straightforward recipe you can follow even if you’re new to baking lemon-themed treats.
- Perfect Anytime Meal: Whether brunch, teatime, or dessert, these rolls fit right in and elevate the moment.
The Essentials: Ingredients That Do the Work
To get these lemon rolls just right, I always suggest picking the freshest lemons—since the zest and juice are the stars of the flavor show. For the dough, a good quality butter makes all the difference, lending that golden, tender crumb you’re aiming for. And don’t forget the sugar—it’s just enough to sweeten but not overwhelm that perfect citrus brightness.
- Fresh Lemons: Look for firm, glossy skins for the juiciest zest and juice packed with vibrant flavor.
- Unsalted Butter: Choose high-quality butter to ensure the rolls bake with a rich, toasty edge without extra saltiness.
- All-Purpose Flour: The base of your dough that provides structure—sift it for fluffier rolls.
- Granulated Sugar: Balances the tartness, giving a mild sweetness that sings.
- Yeast: The quiet hero that adds the gentle rise and light, airy texture you’ll adore.
Quick Note: Precise amounts and timing live in the recipe card at the end—keeping this guide focused on tips and mood so you can bake confidently.
Step-by-Step: Bringing Lemon Rolls Recipe to Life
Step 1 — Gather, Chop, and Prep
Start by pulling together your ingredients and giving the dough ingredients a quick measure. I like to have everything within arm’s reach—it keeps me relaxed. If you’re zesting lemons, do it before juicing for an easier, zestier experience. Prepare your workspace with a clean surface for rolling and a warm spot for dough rising. You’ll know the dough is ready to roll when it feels soft and slightly tacky but doesn’t stick to your fingers.
Step 2 — Heat, Stir, and Build Flavor
As you bring the lemon filling together, you’ll heat sugar, lemon juice, and zest gently until the mixture thickens into a luscious, pudding-like texture. The moment your kitchen fills with that bright, tangy aroma, you’ll know you’re on the right track. Don’t rush this part—stirring slowly and patiently lets the flavors deepen and the filling get perfectly creamy without lumps.
Step 3 — Finish and Taste-Test
After the rolls rise and bake to a warm, golden brown, it’s time for the most rewarding step: tasting. You’ll notice a lovely balance of creamy lemon filling that isn’t too sharp but snaps with fresh zest. If you want to add a glaze or dusting of sugar after baking, it’s best done while they’re still warm for that shiny, sticky finish you can’t resist.
Pro Moves to Elevate It
Here’s where your Lemon Rolls Recipe shoots from good to unforgettable. These tips come from my many mornings fine-tuning this treat—easy tweaks that bring out the best textures and flavors.
- Heat Wisdom: Simmer the lemon filling gently; too high a flame can make it grainy, but slow heat keeps it creamy.
- Timing Trick: Let the dough rise in a warm, draft-free spot—maybe near a sunny window—for an ideal soft texture.
- Make-Ahead Strategy: Assemble the rolls the night before and refrigerate overnight, then bake fresh in the morning for a flavor boost.
- Common Slip-Up: Don’t overfill the rolls with lemon filling—it’ll leak and make a mess; a thin, even layer is perfect.
Switch It Up: Creative Variations
Once you’ve mastered the classic Lemon Rolls Recipe, feel free to play around—to me, that’s half the joy. Whether it’s a sprinkle of poppy seeds for a nutty crunch or a swirl of raspberry jam alongside the lemon filling, customizing these rolls keeps the magic fresh and personal.
When You’re Feeling Bold
Try adding a touch of grated ginger or swapping the lemon for orange zest to change the profile entirely. Another fun twist is folding in cream cheese before rolling, creating a luscious, velvety filling contrast. If you love texture, mix chopped toasted pecans or slivered almonds into the lemon spread before rolling for a surprise crunch.
Storage & Reheating Tips
If you’re lucky enough to have leftovers (which, honestly, rarely happens!), store them in an airtight container at room temperature for up to two days. For longer keeps, freeze wrapped rolls for up to a month. When you want to enjoy again, reheat gently in the oven or toaster oven until warm and toasty—this revives that fresh-baked scent and soft crumb beautifully.
Serving Inspiration
These lemon rolls shine on their own but pair beautifully with a cup of creamy coffee or a bright herbal tea. For a brunch spread, try them alongside whipped mascarpone and fresh berries for an elegant, effortless touch. On casual mornings, a simple smear of butter or a drizzle of honey makes them feel extra special. They’re the kind of pastry that works anytime you want to feel a little pampered.
Frequently Asked Questions
Fresh lemon juice makes a big difference in flavor brightness and aroma, so I recommend using fresh whenever possible for the best results.
Look for a golden, lightly crisp top and a soft but set interior. A toothpick inserted near the center should come out clean or with just a few moist crumbs.
Absolutely! After shaping, cover and refrigerate overnight to bake fresh in the morning, which actually deepens the flavor and texture.
Warm them gently in a 300°F oven for about 5-7 minutes or in a toaster oven to revive that soft interior and toasty exterior without drying them out.
Notes & Handy Tools
A sturdy stand mixer with a dough hook speeds up kneading perfectly, but a good set of hands and a little patience will also do the trick wonderfully. A zester or microplane makes the lemon zest bright and fine, adding essential brightness. A baking thermometer helps if you want to be absolutely sure your yeast is activated correctly, and a reliable oven thermometer ensures even baking heat—both small investments for great baking confidence.
PrintFull Recipe
Lemon Rolls Recipe

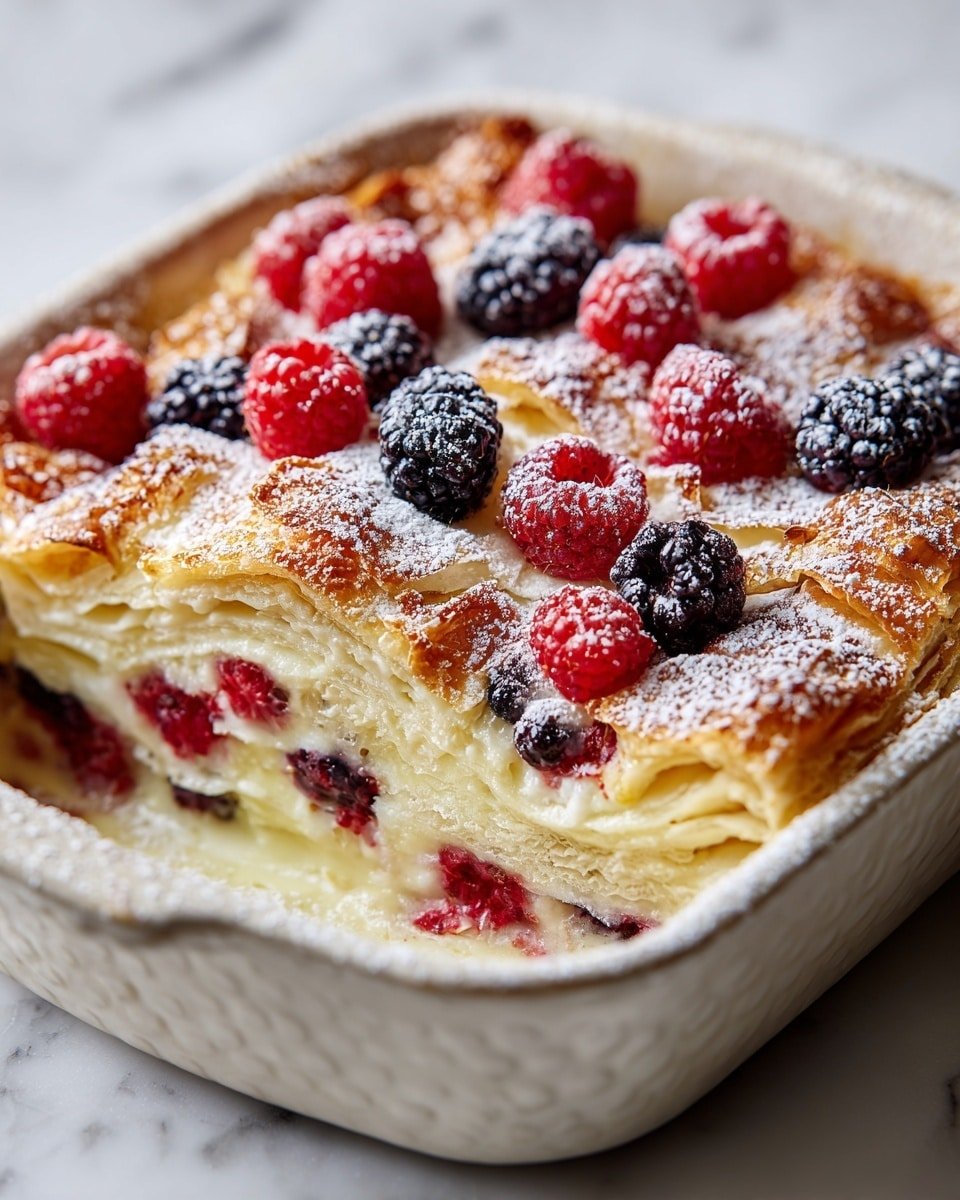
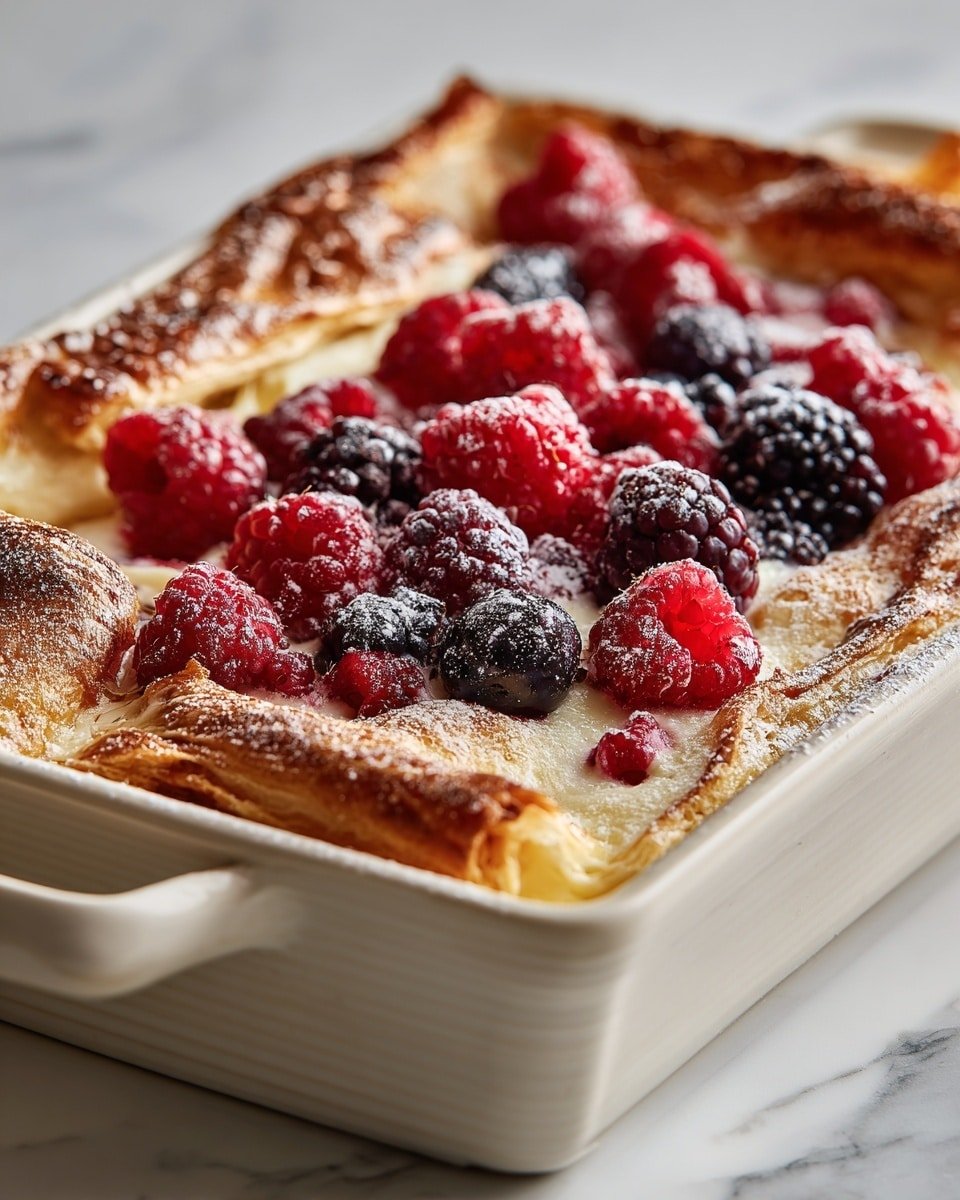
A delicious and easy-to-make Berry Croissant Breakfast Bake featuring layers of flaky croissants soaked in a creamy custard with mixed berries. Perfect for a cozy breakfast or brunch, this recipe combines buttery croissants with sweet and tangy berries baked to golden perfection and topped with powdered sugar for an inviting presentation.
- Prep Time: 20 minutes
- Cook Time: 40 minutes
- Total Time: 1 hour
- Yield: 6 servings
- Category: Breakfast
- Method: Baking
- Cuisine: American
- Diet: Vegetarian
Ingredients
Main Ingredients
- 6 croissants, slightly stale or a day old
- 2 cups mixed berries (blueberries, raspberries, strawberries, or blackberries)
- 1 ½ cups whole milk
- 1 ½ cups heavy cream
- 4 large eggs
- 1 teaspoon vanilla extract
- ⅓ cup granulated sugar
- 2 tablespoons powdered sugar (for garnish)
- Optional: 1 tablespoon lemon zest for a citrusy boost
Instructions
- Prepare Your Baking Dish: Preheat the oven to 350°F (175°C). Grease a 9×13-inch baking dish to ensure the croissant layers bake evenly without sticking.
- Cut and Arrange the Croissants: Slice the croissants into halves or quarters. Arrange them in the dish, allowing some pieces to sit higher than others for texture and custard flow.
- Add the Berries: Scatter the mixed berries evenly across the croissants. Mix colors for visual appeal and even fruit distribution.
- Make the Custard: In a large bowl, whisk together eggs, whole milk, heavy cream, vanilla extract, and granulated sugar until fully smooth. This custard creates the creamy base that binds the bake.
- Pour and Soak: Pour the custard slowly over the croissants, pressing gently so each piece absorbs the liquid. Allow the dish to rest for 20 minutes or refrigerate overnight for deeper flavor and better texture.
- Bake Until Golden: Bake for 40 minutes, or until the top becomes golden and the custard is set but still softly jiggling in the center to keep it creamy.
- Garnish and Serve: Cool slightly, then dust with powdered sugar. Optionally add maple syrup, whipped cream, or fresh berries for extra indulgence before serving.
Notes
- Use slightly stale croissants as they absorb custard better and avoid sogginess.
- Press gently after pouring custard to maintain flaky texture while ensuring deep absorption.
- Add lemon zest for a bright, bakery-style citrus flavor contrast.
- Frozen berries can be used directly without thawing to prevent excess moisture.
- Do not overbake; leaving a slight center jiggle keeps the custard creamy and tender.
- Heavy cream enriches the custard for a smooth and luxurious texture.
- Mix berry colors for a visually stunning presentation suitable for brunch or holidays.
- Overnight chilling enhances flavor depth and custard-like texture.
- For a caramelized top, broil the bake for the last minute of cooking.
- Use a glass baking dish for even heat distribution and better visual appeal.
- Consider adding a cream cheese layer to create a richer, cheesecake-like variation.


Leave a Reply